Getting Started
Welcome to our step-by-step guide to the Reachu Universal Ecommerce Integration. This comprehensive guide will provide you with all the information you need to successfully connect your ecommerce system, no matter which one it is, to our service. By following the clearly defined steps, you will be able to establish a seamless link between your ecommerce platform and ours, enabling a consistent and efficient exchange of data. From identifying your platform and setting up authentication, to configuring your API wrapper and data mapping, right through to data synchronization and integration implementation - each step is carefully explained to ensure a smooth setup process. Let's get started on your integration journey.
Setup
Step 1: Identify the E-commerce Platform
From the Reachu platform on settings -> ecommerce, you can connect your
ecommerce system by clicking on the Connect your ecommerce button on. This
will open a modal with the following fields: The first step involves identifying
the ecommerce platform in use. Predefined integrations for widely utilized
platforms such as Shopify, WooCommerce, or Magento are available. Detailed
documentation specific to these platforms can be accessed via the following
links:
The scope of this document, however, is concentrated on integrations for custom or unlisted ecommerce systems, which fall under the category of "Other".
The selection of "Custom" indicates the employment of a custom or non-predefined ecommerce platform. This selection initiates an integration process that caters specifically to the unique requirements of such platforms, thereby enabling a more tailored and streamlined approach.
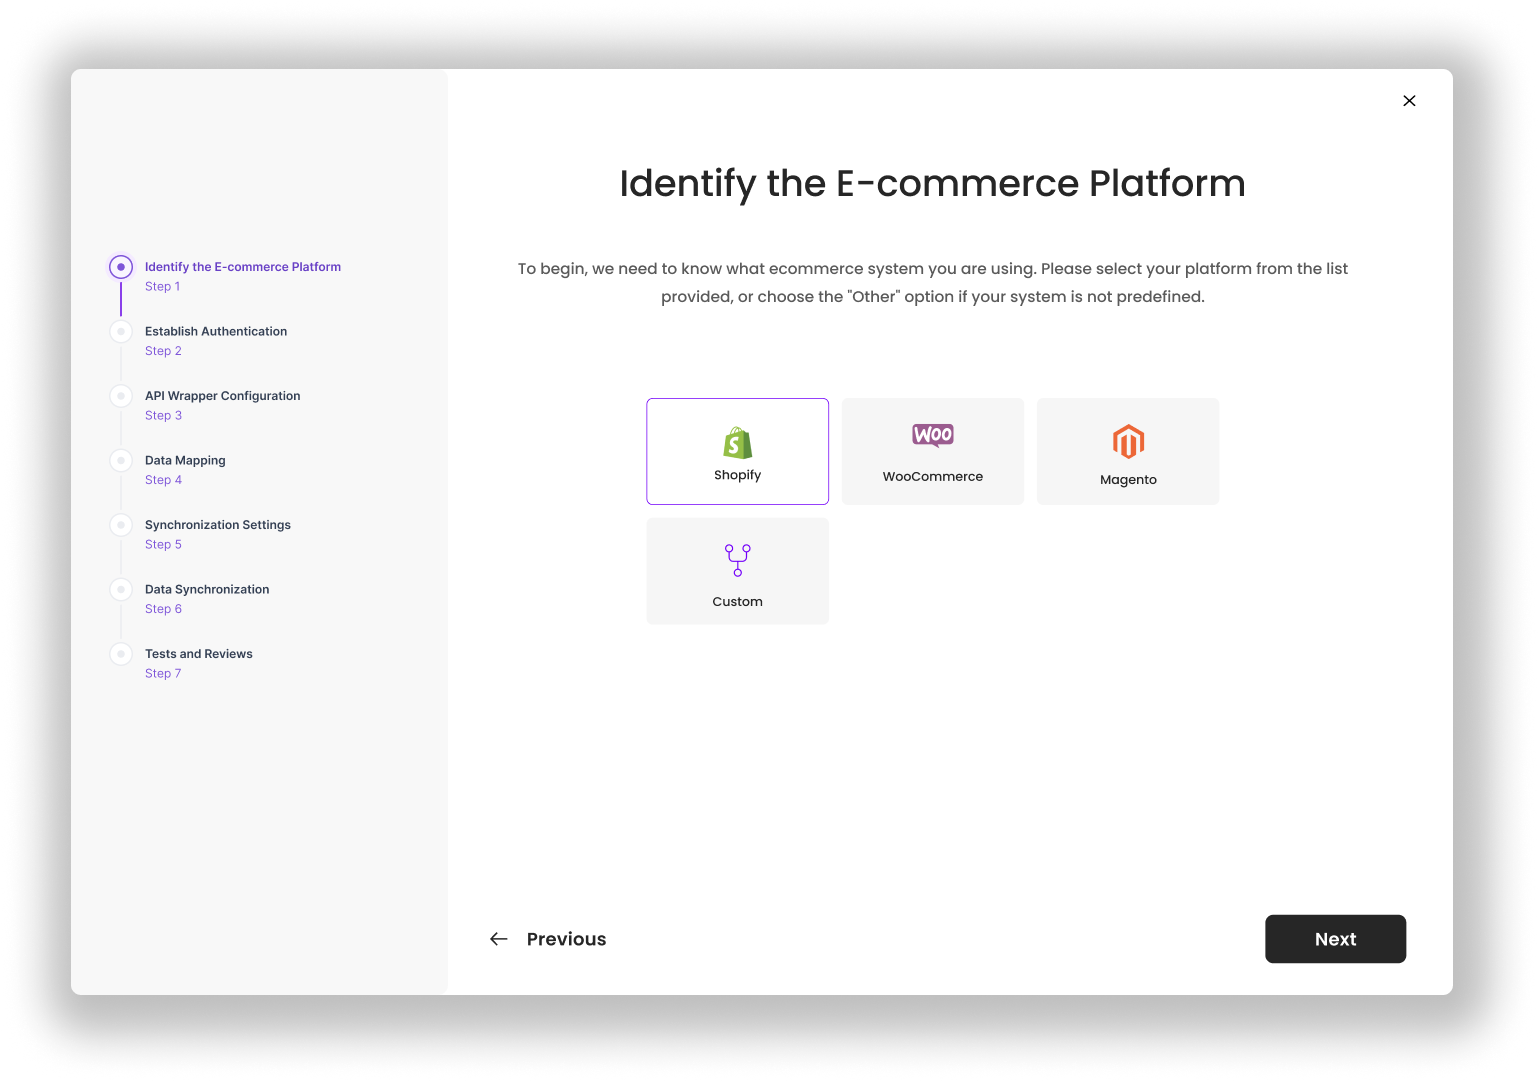
Select custom if you are using a custom or non-predefined ecommerce platform and
click on the Next button.
Step 2: Establish Authentication
The second step involves the setup of authentication. The authentication process is unique to each ecommerce platform and is therefore dependent on the platform in use. The following authentication methods are available:
- API Key
- OAuth
- Basic Auth
- Token Auth
- OAuth2
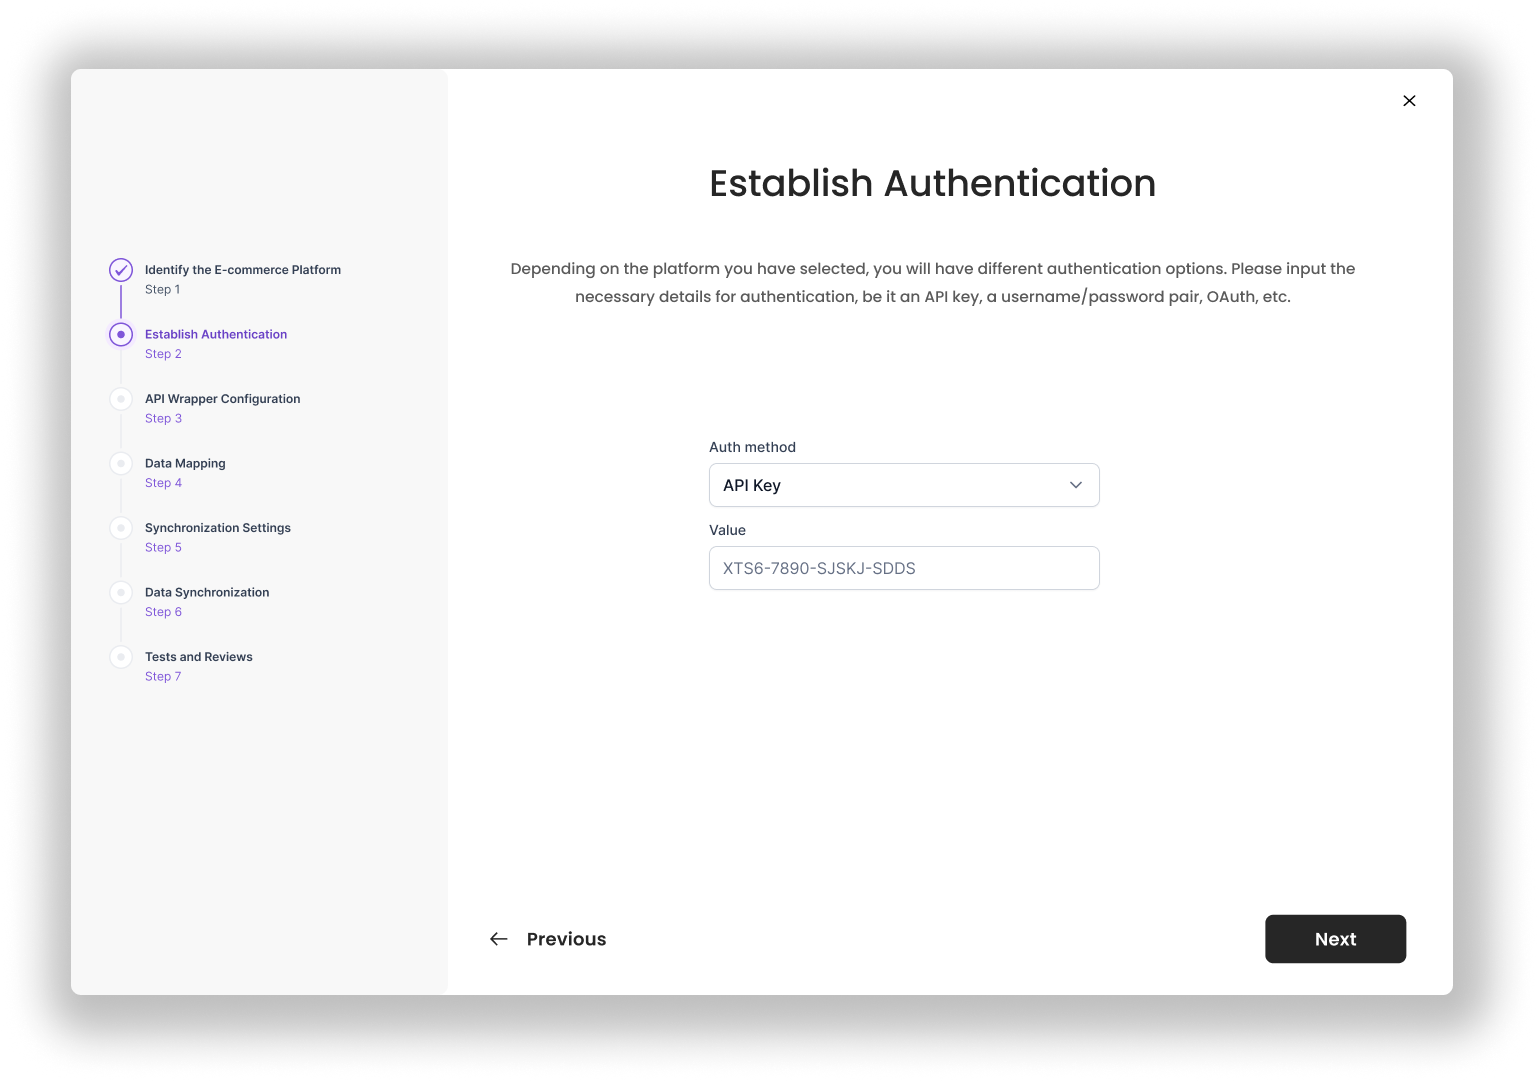
From the dropdown select the authentication method your system works with and
fill in the required fields and click on the Next button.
Step 3: Configure API Wrapper
In this stage, we'll create an API wrapper to manage interactions between your ecommerce system and our platform. To make this as smooth as possible, we'll guide you through a simple setup process.
- API URL:
Enter the URL of your API endpoint. This will be the primary endpoint that we'll interact with.
- HTTP Method:
Select the HTTP method (GET, POST, PUT, DELETE, etc.) that your API endpoint uses for the function you want to perform.
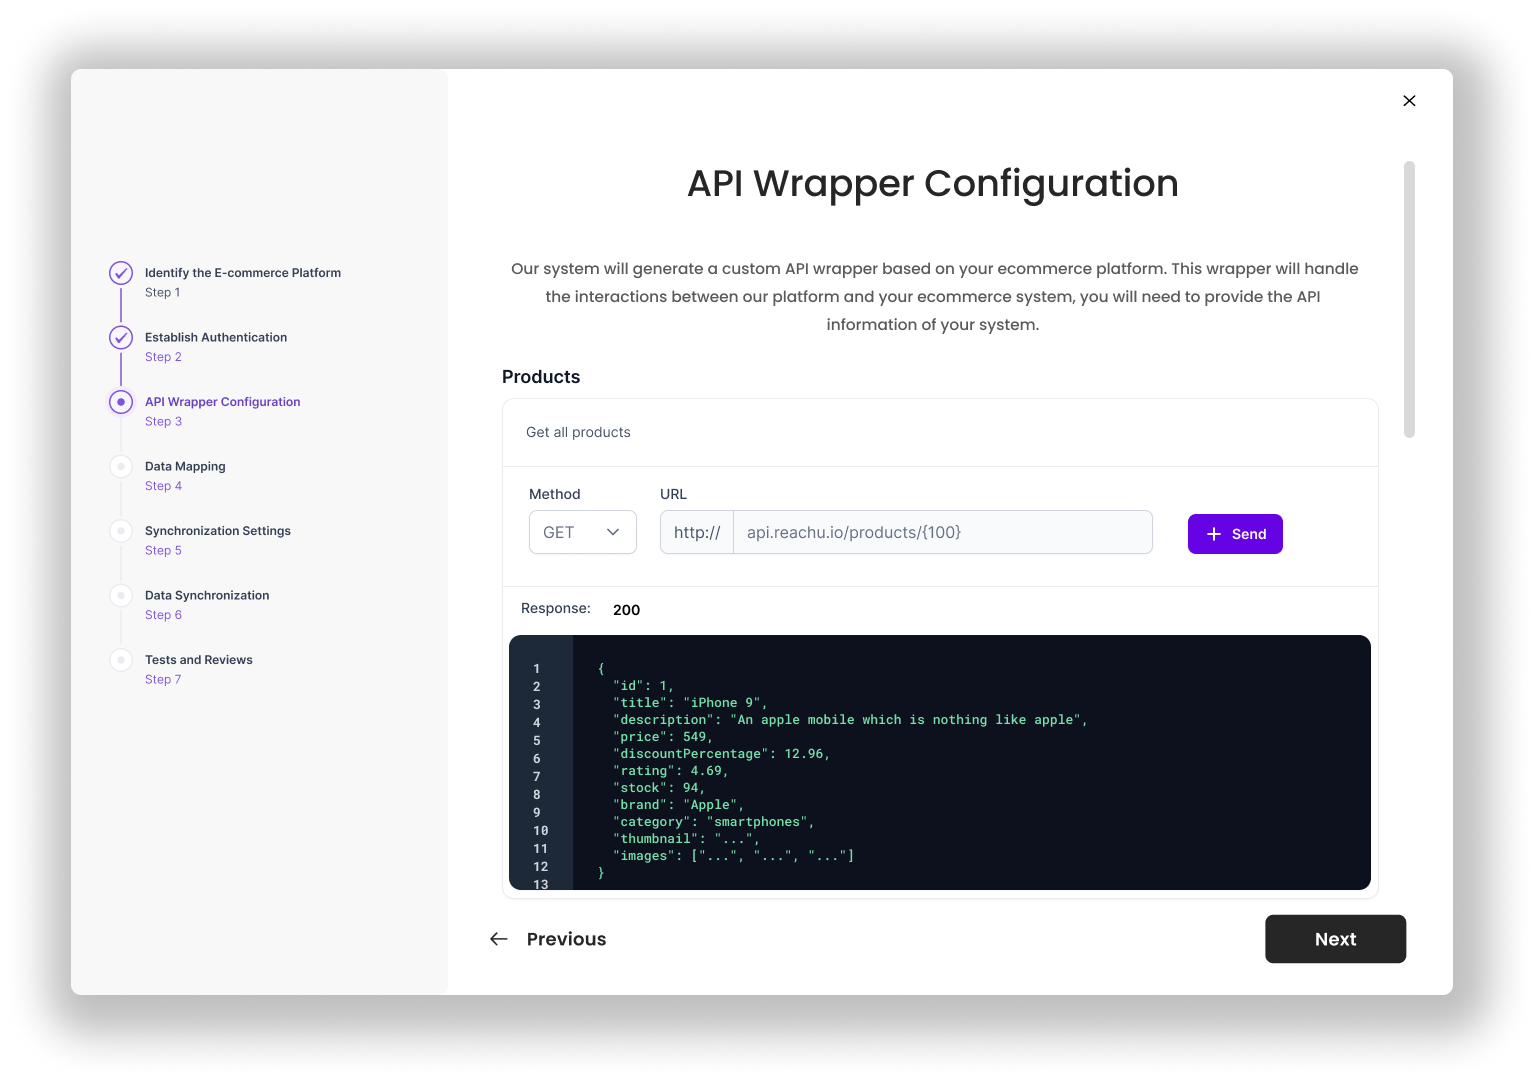
Once you've entered these details, click on the "Send" button. This will execute the request with the authentication credentials that you provided in Step 2.
After the request has been made, we'll show you the response data we received, as well as the HTTP response status code. This will give you an overview of what data we can access from your ecommerce system, and it will help us ensure that we're synchronizing the correct data with our service.
Step 4: Map your Data
In this step, the goal is to create a consistent data structure between your ecommerce system and our platform. To assist you, we will present a set of standard fields (like "product", "price", "stock", etc.) which you need to map to their counterparts in your system's data structure.
This is a visual task and you'll do it right in our interface. You'll see each parameter from the response we received in the previous step. Your task is to match, or 'map', these to our standard fields. For example, you might match 'product_title' from your system to 'title' in ours.
In addition to matching the names, you can also specify the type of data each field should contain. This could be a string, integer, boolean, etc. The type you choose should match the type of data that your ecommerce system uses for that field.

Once all data is successfully mapped, click on 'Next'.
It's crucial to note that this mapping process should be carried out for both product and order data. The better the mapping, the smoother the data synchronization will be between your ecommerce system and our servise.
Step 5: Set Up Your Webhooks
At this point, we are focusing on setting up the means through which data updates are transferred between your ecommerce system and our service. We currently support webhooks, a real-time data delivery method that triggers an update whenever a change occurs in your system.
Please note that at this time, our primary method for data synchronization is through webhooks. If your ecommerce system does not support webhooks and you require polling instead, we encourage you to contact our development team for further assistance. We understand the importance of flexibility in integration methods and are here to support your needs.
The interface for setting up webhooks is similar to the API wrapper configuration in Step 3. You'll be provided with fields to input the URL and request type for your webhook. Importantly, we also require that you provide a sample payload — an example of the data that your system expects to receive when an update occurs. This sample payload allows us to understand the structure and content of the data your system is designed to handle, ensuring we can format our updates in a way that your system can effectively process.
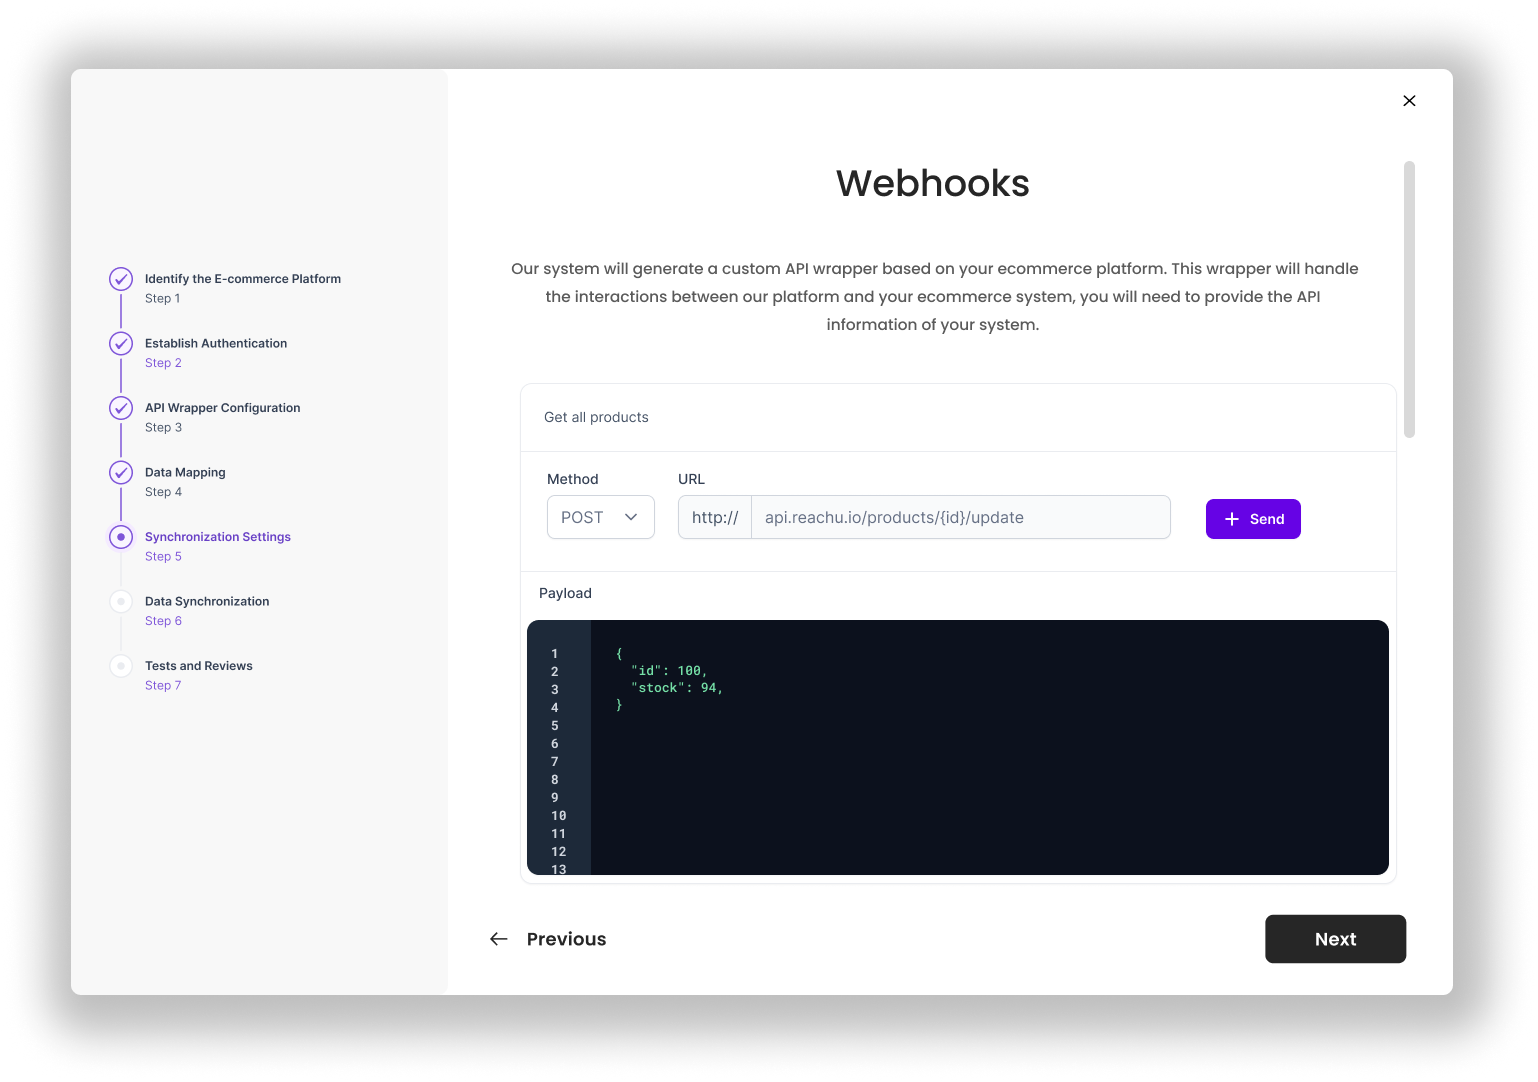
After inputting this information, please click 'Next'. Our system will use this information to configure the webhook for data synchronization.
Step 6: Test and reviews
With the configuration complete, it's now time to test the integration and ensure that data is seamlessly syncing between your ecommerce system and our platform.
On the test page, you will see a 'Start Test' button. Clicking this will initiate a series of tests to verify the data mapping and synchronization settings. During this process, our system will attempt to send a test payload to your webhook URL, using the same format as the sample payload you provided.
The test results will be displayed in real-time, allowing you to monitor the data exchange and check for any discrepancies or issues. If the test is successful, you'll see a 'Success' message. If the test uncovers issues with the data exchange, these will be clearly flagged for your attention.

Congratulations! If you've followed all the steps and have successfully completed the tests, your ecommerce system is now set up to integrate with our platform. Your next step is to save the settings to secure your integration configuration.
Now, you're ready to import your products. Navigate to the 'Products' section on our platform, where you can start importing the products from your ecommerce system to our platform. The world of seamless ecommerce integration is now at your fingertips!
Remember, if you encounter any issues along the way, our support team is here to help. Feel free to reach out to us at any point in the process. Welcome aboard, and happy selling!