Tutorials
This short tutorial will explore how to integrate install and use Reachus SDKs main operations, from fetching products to initiate a checkout. We will use Reachus SDK to load our data using the Reachu API and enable the payment solution.
Requirements
To follow this tutorial, there are the following requirements:
- Basic understanding of React and TypeScript
- Node, yarn (or npm) installed
- An account on the Reachu platform
This tutorial is intended to initiate a new project from scratch and showcase all sdk funcionalities. Additional styling or frontend interactions will not be covered.
Setup the project
Let's start by creating a new React application.
npx create-react-app my-app
cd my-app
Next, we need to install the Reachu SDK
npm i @reachu/sdk
Then, let's start the development server
npm start
Connecting to Reachu
Now that we kickstarted our project, we need to create a connection to Reachu and enable the store solution.
To initialize the connection, go to src/, create a new file reachu-sdk.ts and add the following code.
import { SdkClient } from '@outshifterdev/sdk';

let sdk;
export function getSDK() {
 if (!sdk) sdk = new SdkClient('YOUR_API_KEY', 'https://api.reachu.io');

 return sdk;
}
This function will do mainly two things: Initialize the connection with Reachu (enabling the SDK and the checkout solution) and provide an API client that we can use to retrieve content from the platform, to be used in our application.
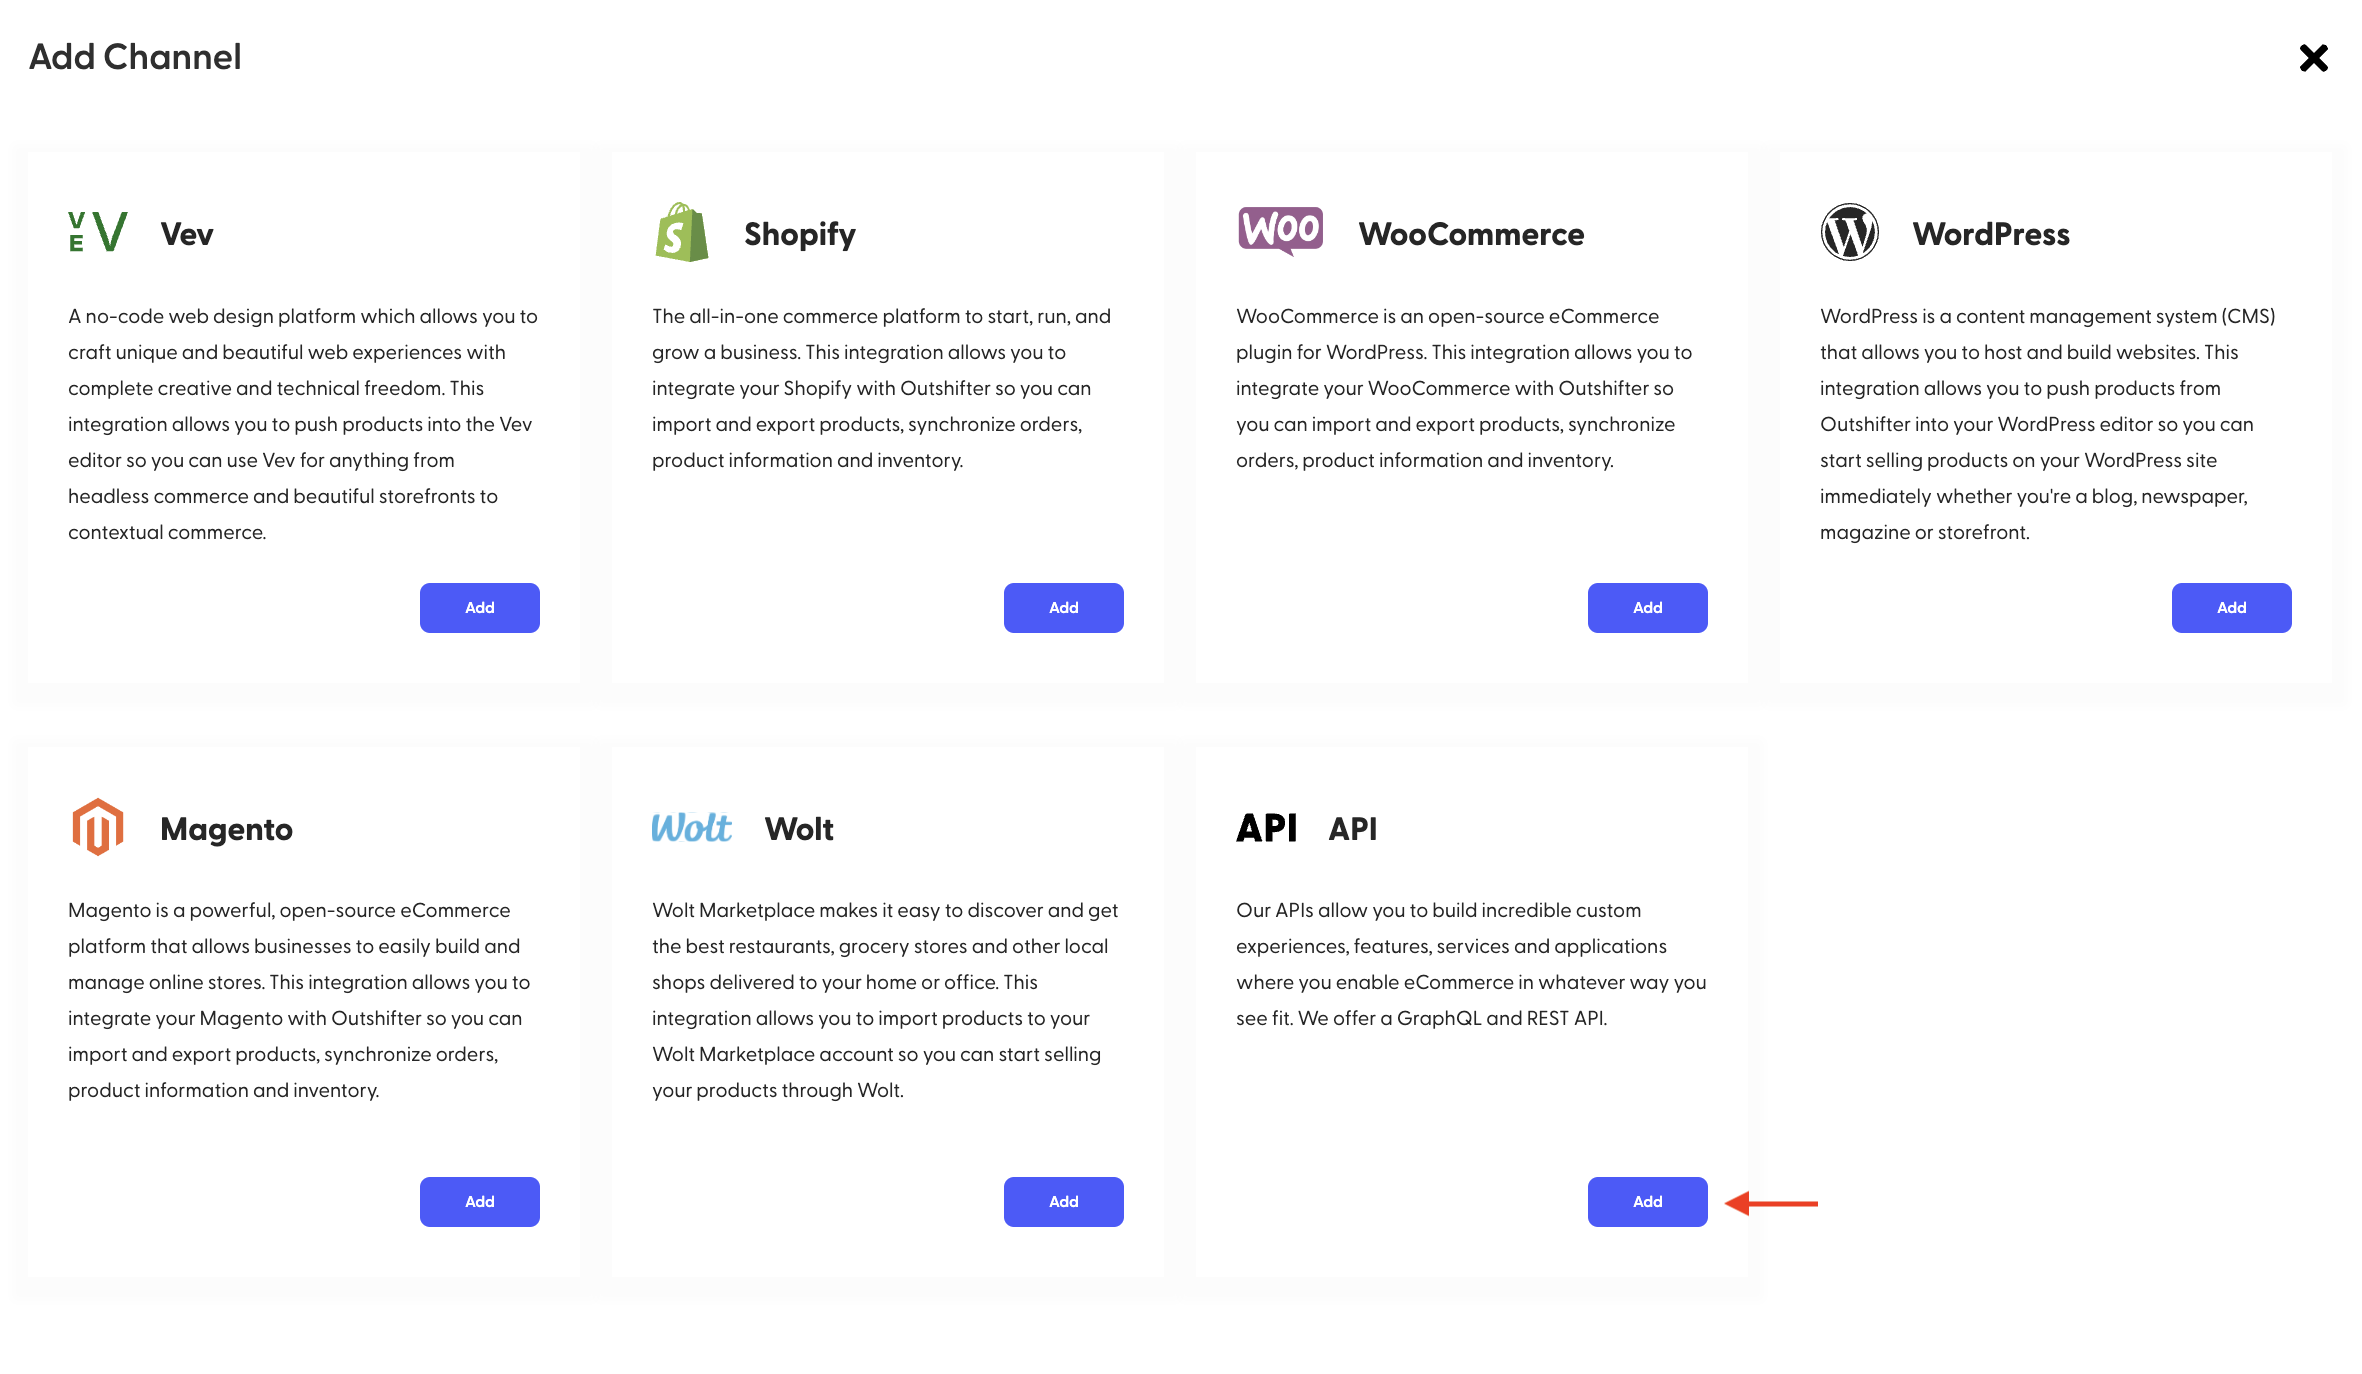
You can get the API Key from the Reachu platform:
- Go to the channels tab and click on the "+ Add a Channel" button
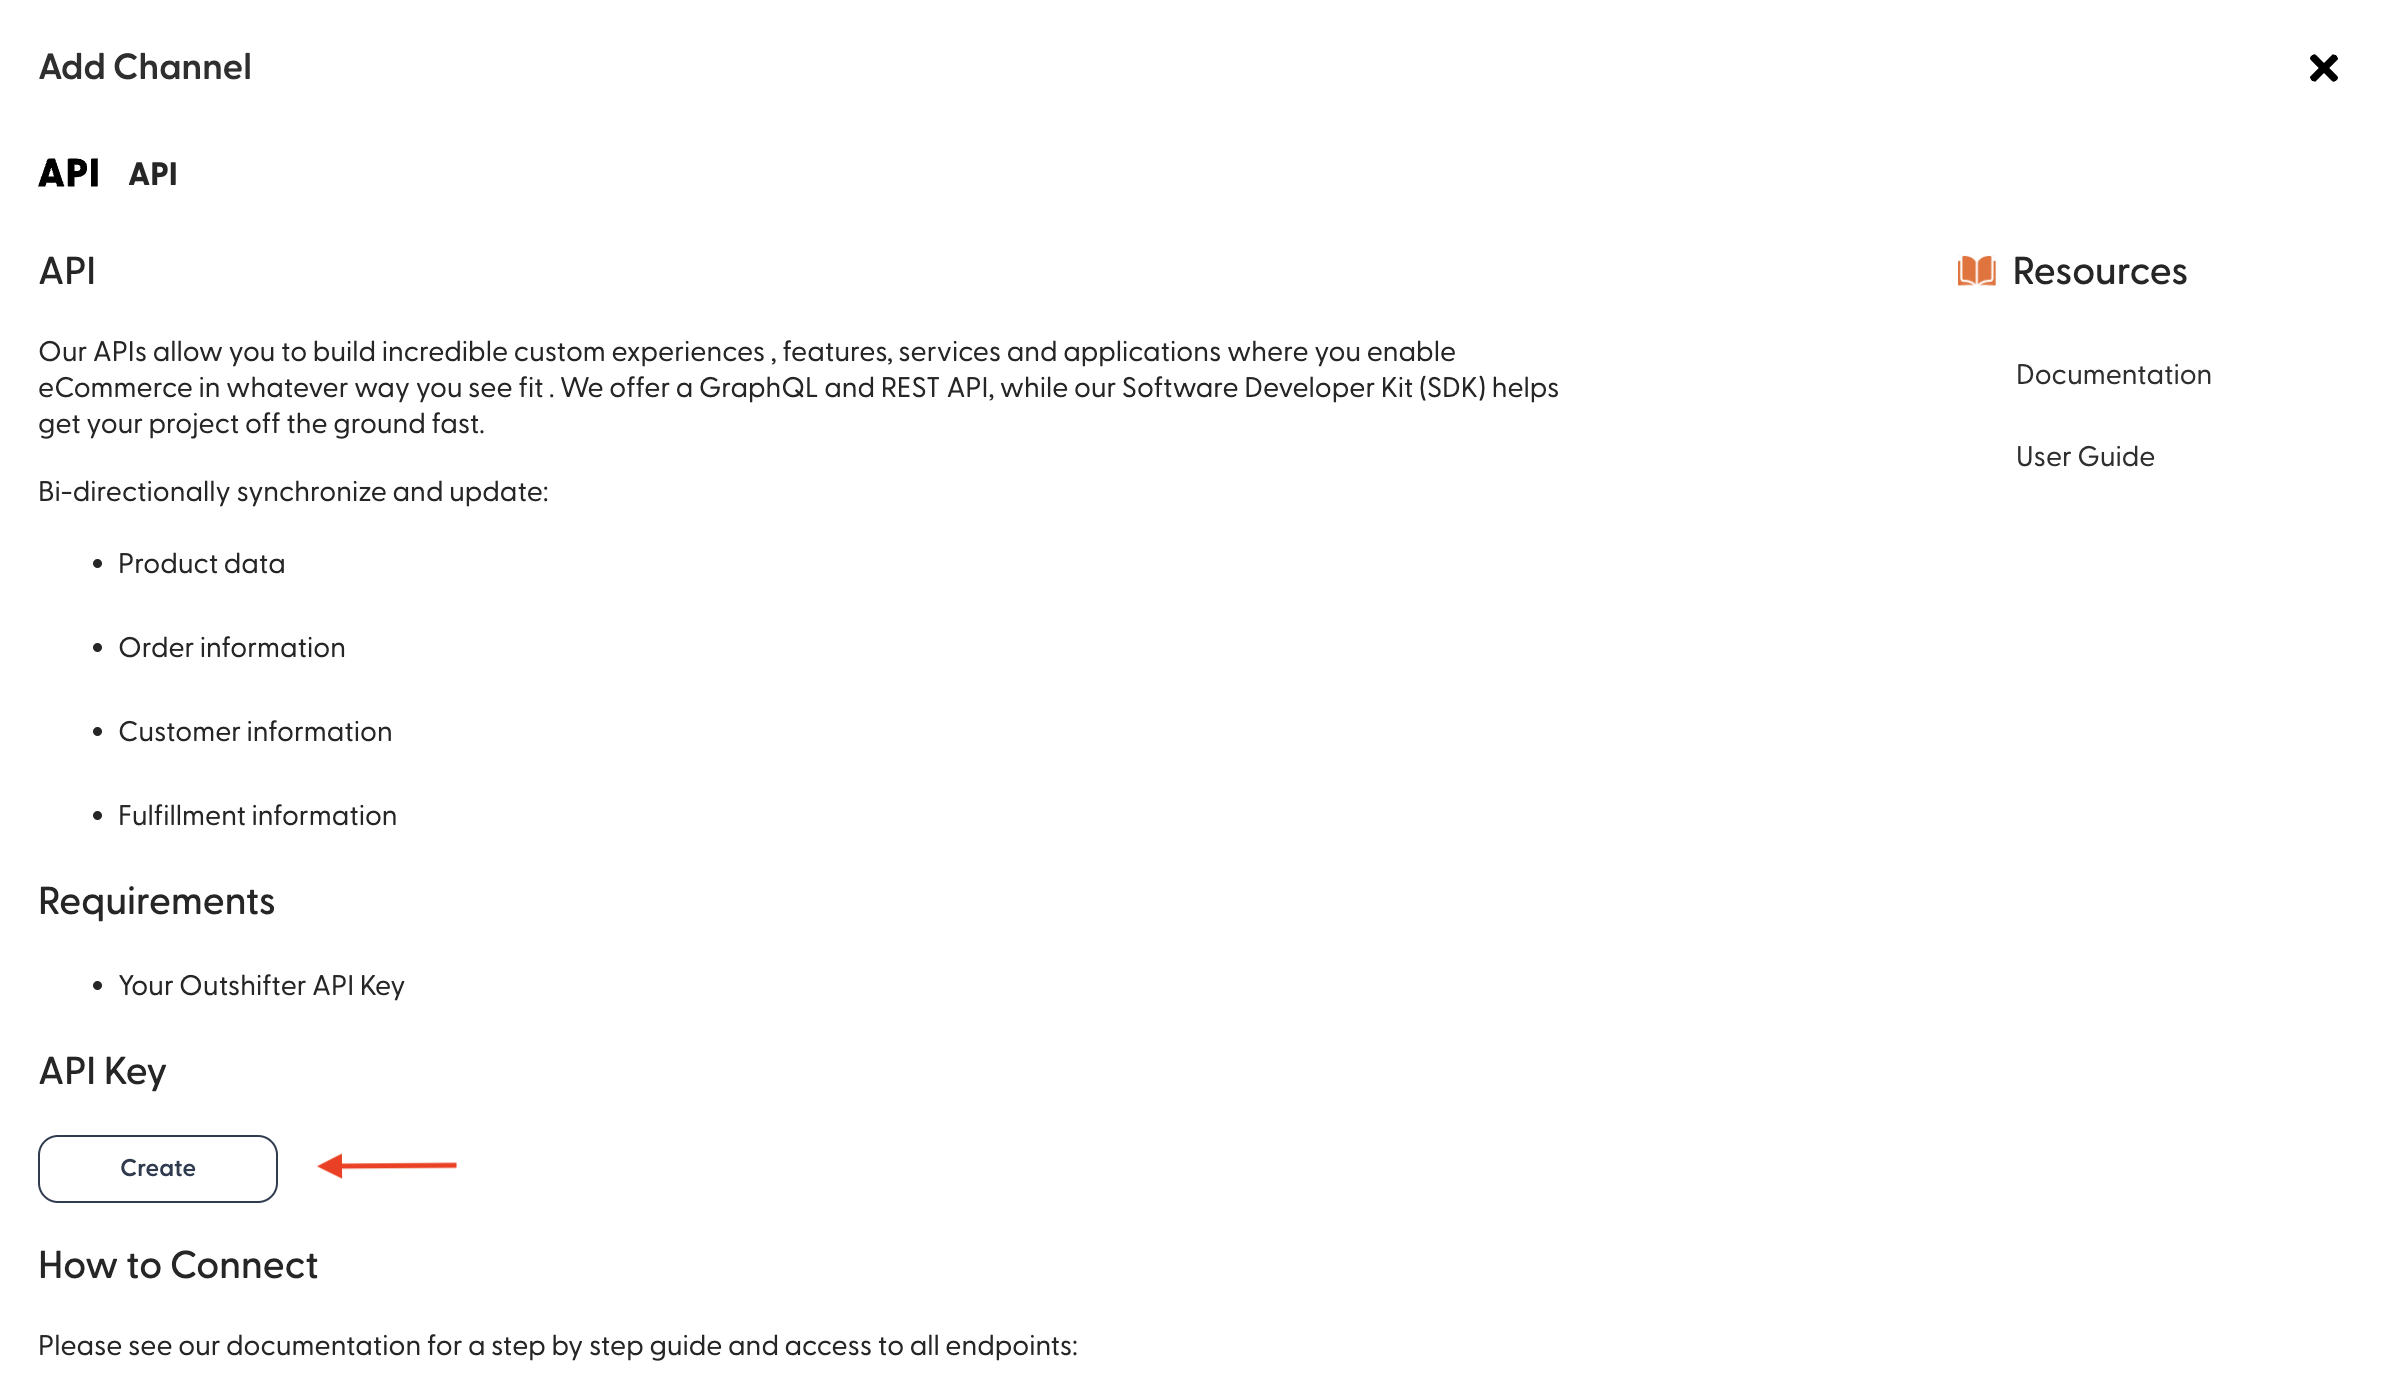
- Choose the API channel, click on the "Add" button
- Click on the "Create" button under the API key section and copy it
- Create the channel by clicking on the "Create API Channel" button
Styling
Let’s add TailwindCSS to our project for the ease of adding styles. You can refer to this guide for adding TailwindCSS to Gatsby.js.
Get products
You can now start to import products to your API channel.
- Go to the Channels tab in the main menu
- Click on the "Manage" button on your channel
- Click on the "Add items" button
You have 3 ways of importing products to your channel:
- Add your own listings you previosly created or imported from your store
- Add your own collection you previously created or imported from your store
- Add a shared collection from a merchant
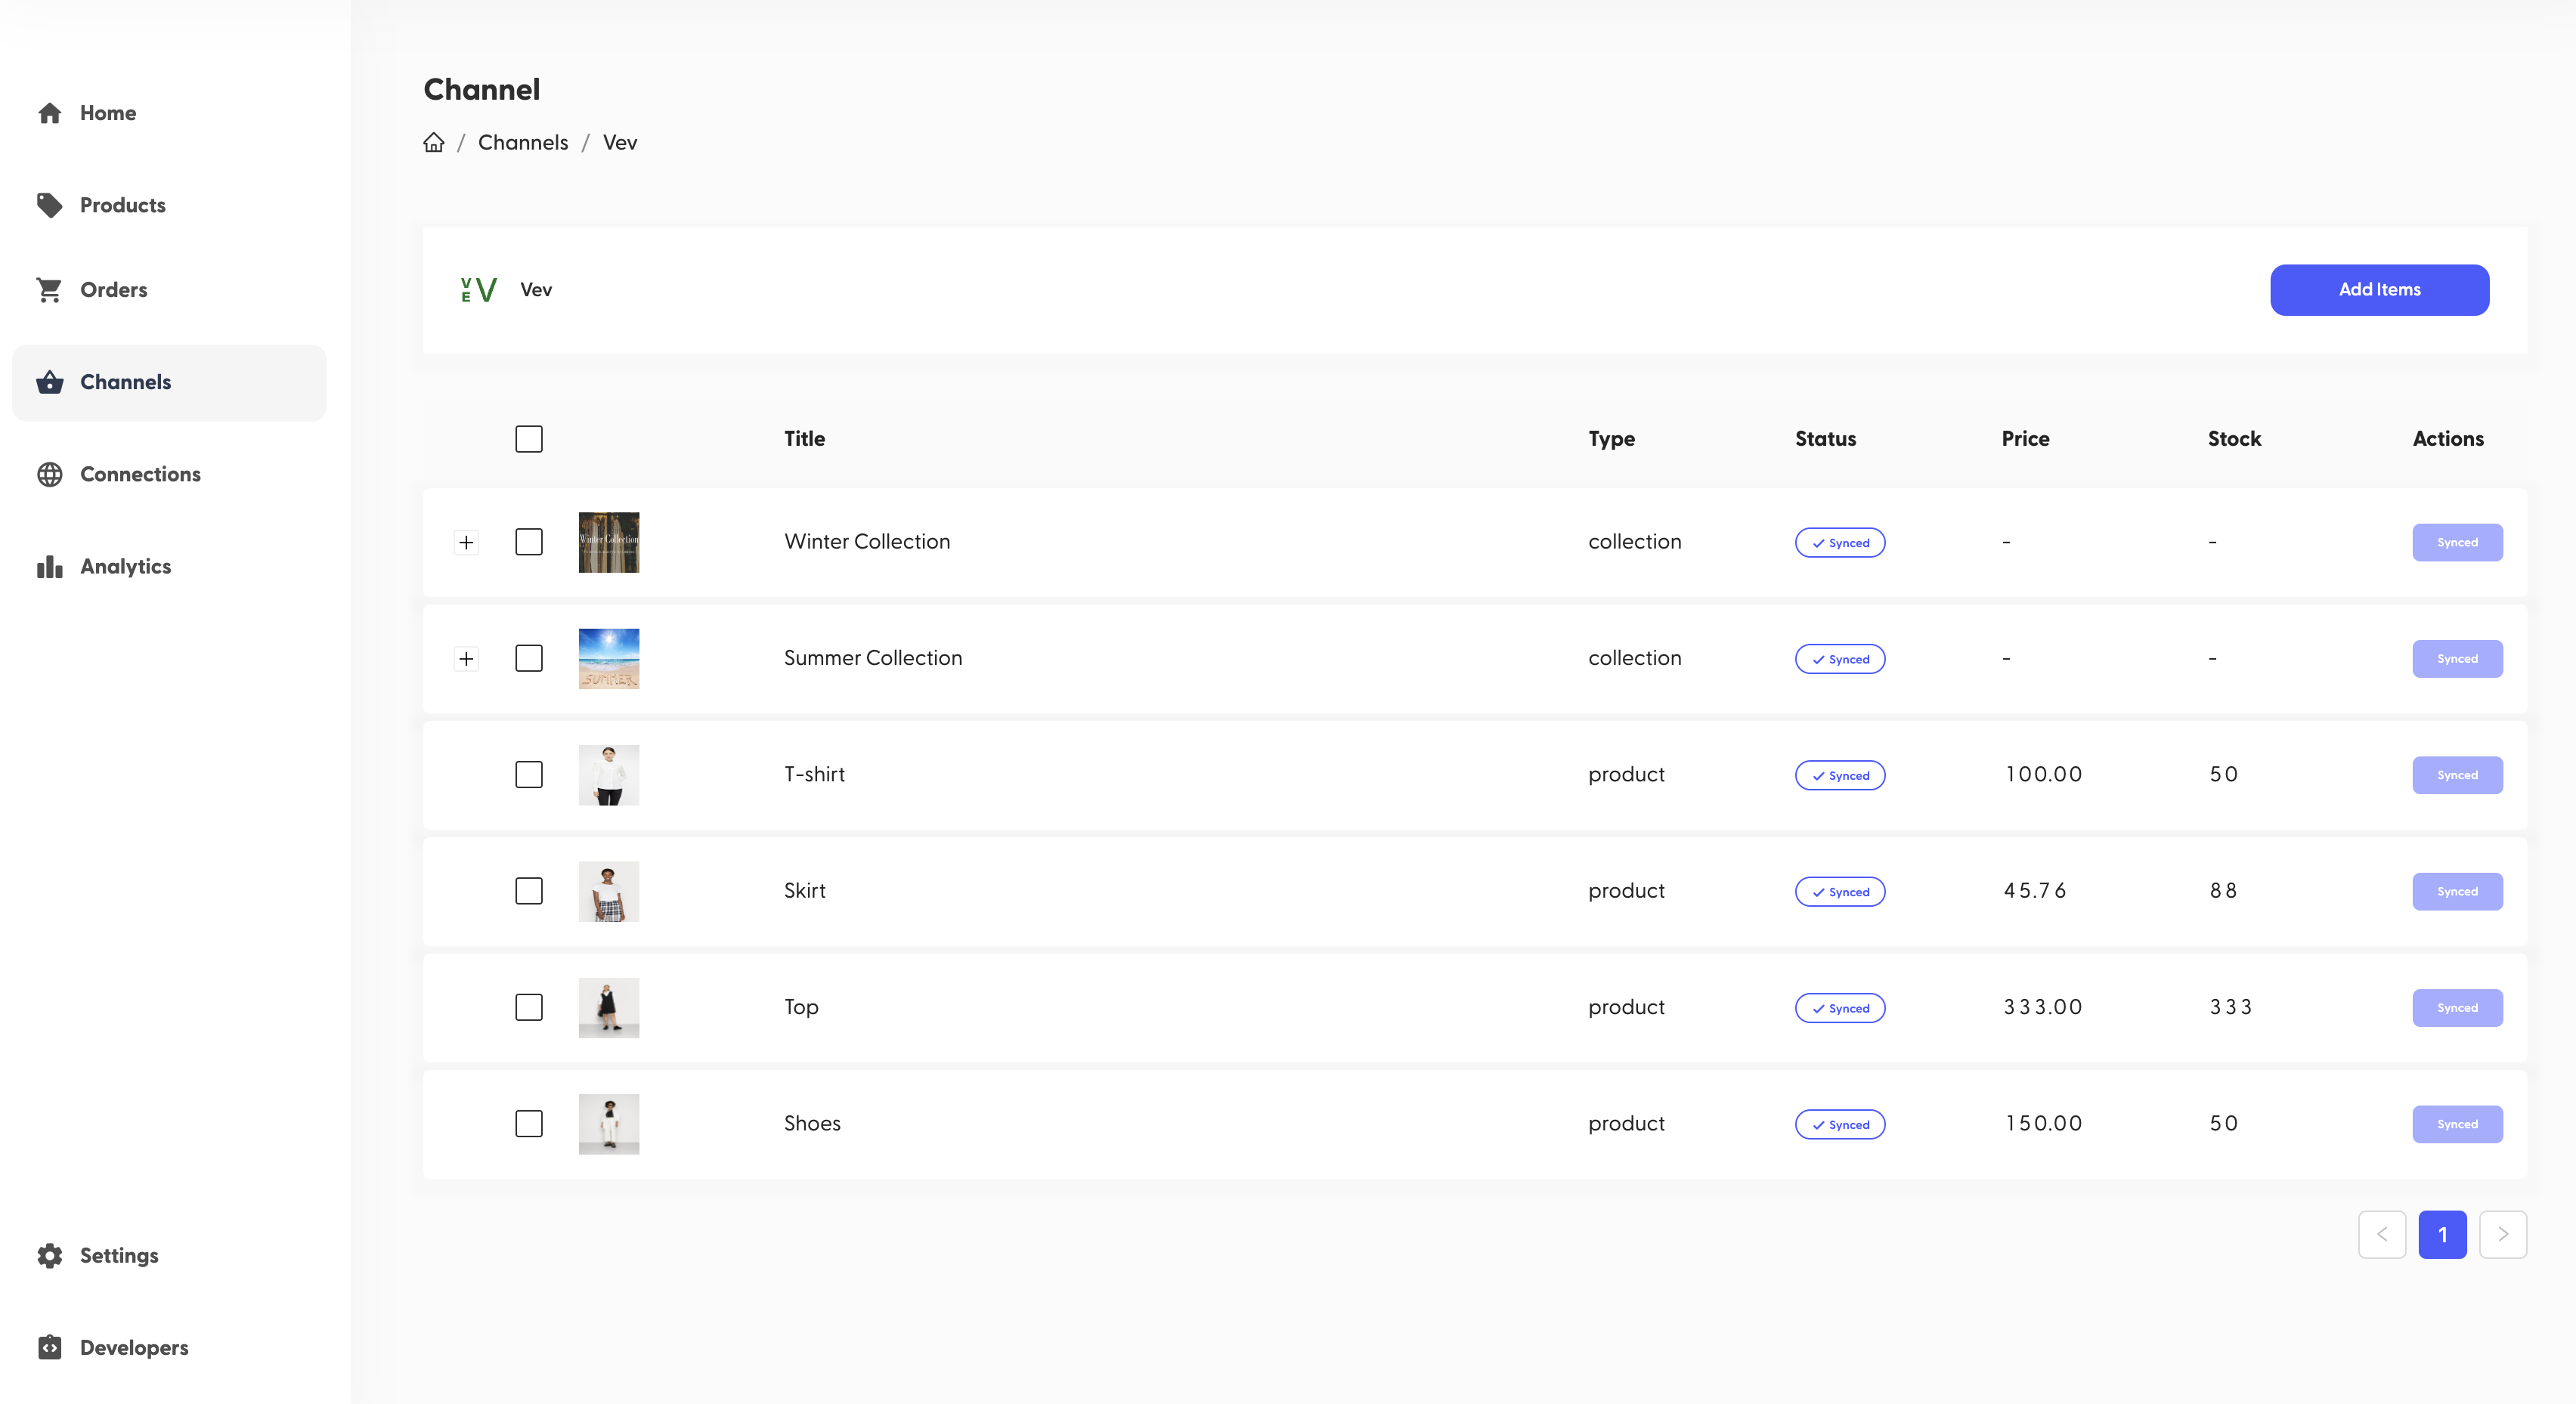
In the products platform tutorial you can see how to add products in any of the three previously mentioned ways. The last option is the most common one since as a sales channel you will probably be working with different suppliers.
Asumming you have imported products or collections to your channel, the section on the platform should look something like this:
Let's begin fetching products on your project using the SDK. Create a new folder src/components/ and a new file DisplayProducts.js:
import { useState, useEffect } from 'react';
import { getSDK } from '../reachu-sdk.js';

const DisplayProducts = () => {
 const [products, setProducts] = useState([]);
 const ProductChannelId = 8;

 useEffect(() => {
 const fetchProducts = async () => {
 const sdk = getSDK();
 const response = await sdk.channel.item.getAll(ProductChannelId);
 setProducts(response);
 };
 fetchProducts();
 });

 return (
 <>
 <h1 className="mb-12 mt-10 text-5xl font-bold">Products</h1>
 <div className="mx-auto max-w-screen-xl">
 <div className="grid grid-cols-6 gap-6">
 {products.map((product) => (
 <div>
 <img src={product.images[0].url} alt={product.title} />
 <div className="mt-2">
 <span className="block font-semibold">{product.title}</span>
 <div>
 <span className="pr-2">{product.price.currencyCode}</span>
 <span>{product.price.amount}</span>
 </div>
 </div>
 </div>
 ))}
 </div>
 </div>
 </>
 );
};

export default DisplayProducts;
You can import the DisplayProducts component on the homepage:
import './App.css';
import DisplayProducts from './components/DisplayProducts';

function App() {
 return (
 <div className="App">
 <main>
 <DisplayProducts />
 </main>
 </div>
 );
}

export default App;
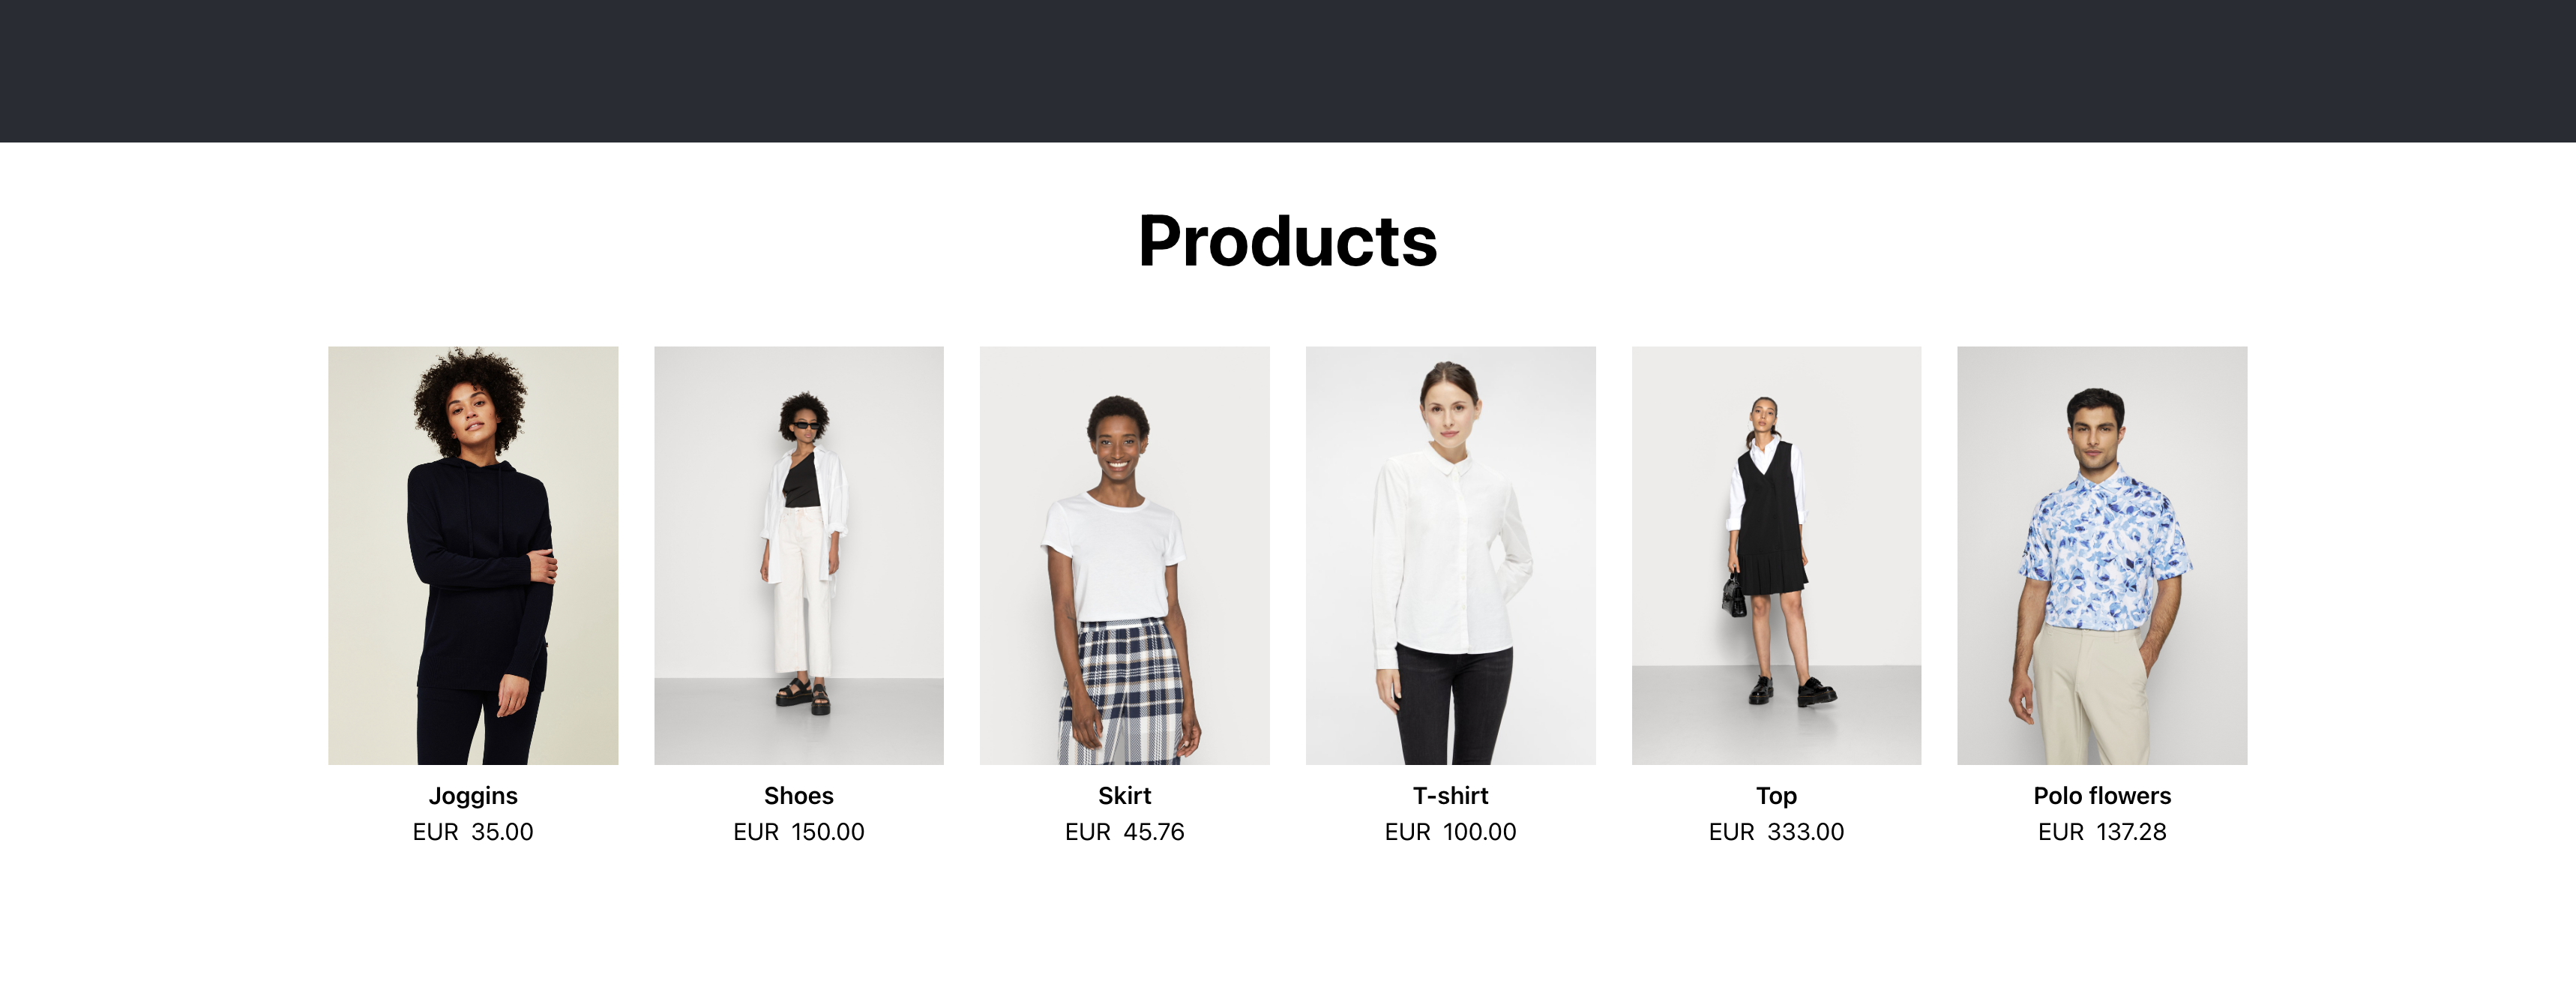
Nice! Your products should be diplaying in the home page and should look something like this:
Interacting with the cart
Create and get the cart
We will start by creating the cart when the user lands to our page, but we do not want to create it each time, so first we need to check if it was previously created.
-
If it doesnt exist we will create it and save the id on the localstorage to fetch it again if the user refreshes the page, but feel free to use a different method but for the tutorial purposes we will use this way.
-
For hadeling states, we will just create a cart state on the main App.jsx file, but here you may use context or any other solution you find more suitable.
Create a new file src/components/DisplayCart.js:
import { useEffect } from 'react';
import { getSDK } from '../reachu-sdk';

const CartItem = ({ item }) => (
 <div className="flex flex-row items-center space-x-12 py-4">
 <img
 className="h-20 w-16 rounded object-cover"
 src={item.product_image?.[0]?.url}
 />
 <div className="flex flex-1 flex-col text-left">
 <div className="text-lg">{item.product_title}</div>
 </div>
 <div className="font-bold">
 {item.price_data.unit_price} {item.price_data.currency}
 </div>
 </div>
);

const DisplayCart = ({ cart, setCart }) => {
 const cartLength = cart?.line_items.length;

 useEffect(() => {
 const fetchCart = async () => {
 const sdk = getSDK();
 const cartId = localStorage.getItem('reachu-cart-id');
 if (cartId) {
 const cart = await sdk.shopCart.cart.getById(cartId);
 if (cart) return setCart(cart);
 } else {
 let newCart = await sdk.shopCart.cart.create({
 currency: 'EUR',
 customer_session_id: Math.floor(Math.random() * 1000000).toString(),
 });
 localStorage.setItem('reachu-cart-id', newCart.cart_id);
 if (newCart) return setCart(newCart);
 }
 };
 fetchCart();
 }, []);

 return (
 <>
 <h2 className="mb-12 mt-10 text-5xl font-bold">
 Cart
 {cartLength > 0 && <span> ({cartLength})</span>}
 </h2>
 {cart?.line_items.map((item) => (
 <CartItem item={item} key={item.id} />
 ))}
 {cartLength < 1 ? (
 <p>Your cart is empty.</p>
 ) : (
 <div className="mt-12 border-t border-black">
 <div className="mt-6 flex flex-row items-center justify-between py-4">
 <span>Total moms:</span>
 <div className="text-xl font-bold">333 {cart?.currency}</div>
 </div>
 <div className="items-cente flex flex-row justify-between py-4 font-bold">
 <span className="text-2xl">Total gyt6x5x</span>
 <div className="text-3xl">
 {cart?.total_amount} {cart?.currency}
 </div>
 </div>
 <button className="mt-6 w-full rounded-lg bg-black px-3 py-3 text-white">
 Proceed to Checkout
 </button>
 </div>
 )}
 </>
 );
};

export default DisplayCart;
On the App.jsx file:
import './App.css';

import DisplayProducts from './components/DisplayProducts';
import DisplayCart from './components/DisplayCart';

function App() {
 return (
 <div className="App">
 <header className="App-header"></header>
 <main>
 <div className="grid grid-cols-4">
 <div className="col-start-1 col-end-4">
 <DisplayProducts />
 </div>
 <div className="col-span-1 col-end-5 h-screen border-l border-black">
 <DisplayCart />
 </div>
 </div>
 </main>
 </div>
 );
}

export default App;
Since we have not added any product yet, the cart is showing as empty:
Add products to the cart
We are need to add an "Add to Cart" button to start the cart interaction.
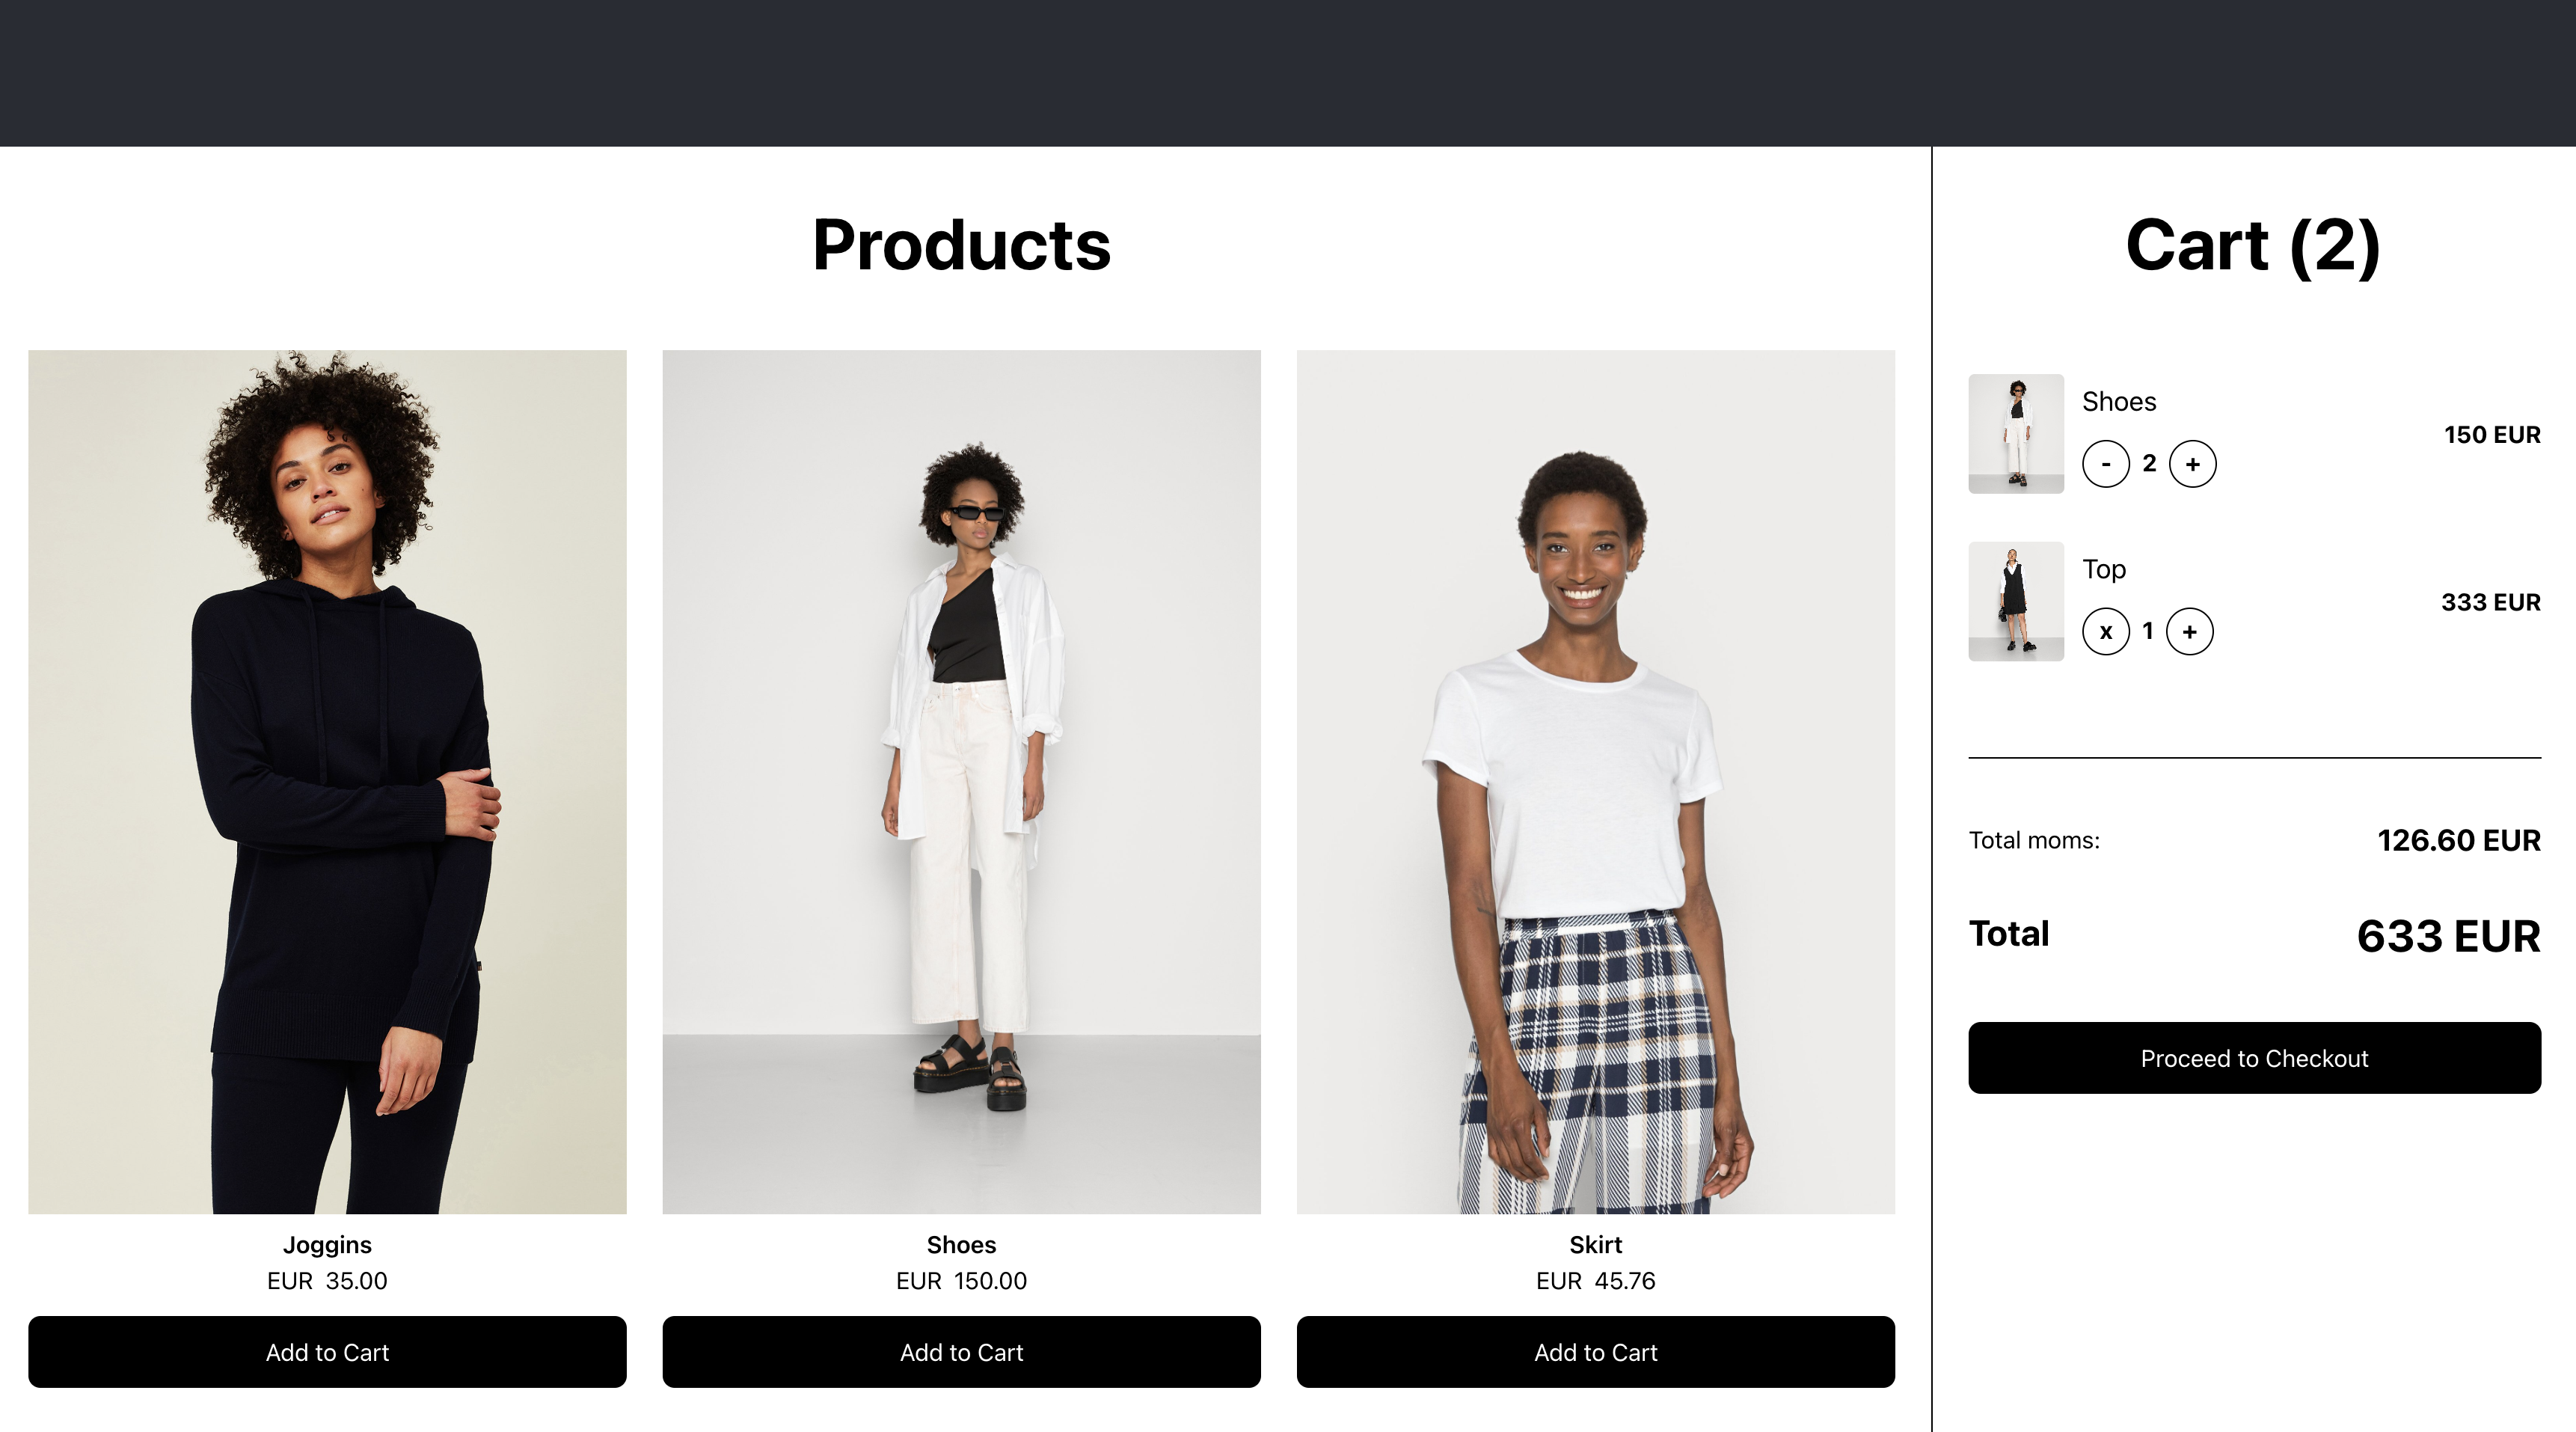
When a user clicks on the "Add to Cart" button they begin to see the cart fulled of items:

On the DisplayProducts.jsx file:
...
 const handleAddToCart = async (product) => {
 const sdk = getSDK();
 const response = await sdk.shopCart.cartItem.create({
 cartId: cart.cart_id,
 line_items: [
 {
 product_id: product.id,
 quantity: 1,
 variant_id: null,
 price_data: {
 currency: product.price.currencyCode,
 tax: 25,
 unit_price: Number(product.price.amount),
 },
 },
 ],
 });
 setCart(response);
 }
...
 {products?.map(product => (
 <div key={product.id}>
 <img src={product.images[0].url} alt={product.title} />
 <div className="mt-2 text-center">
 <span className="block font-semibold">{product.title}</span>
 <div className="mb-3">
 <span className="pr-2">{product.price.currencyCode}</span>
 <span>{product.price.amount}</span>
 </div>
 <button
 className="block mx-auto bg-black text-white px-3 py-3 rounded-lg w-full"
 onClick={() => handleAddToCart(product)}
 >
 Add to Cart
 </button>
 </div>
 </div>
 ))}
...
Handle a product with variants
Let's go through an example. We have a piece of clothing that have different sizes and colors. If a product has variants you will have to pay attention to two properties, options and variants.
options: [
 {
 "id": 152,
 "name": "Size",
 "order": 1,
 "values": "S,M,L"
 },
 {
 "id": 153,
 "name": "Color",
 "order": 2,
 "values": "Black,White"
 }
]
From options you can display a selector for the customer to can choose from:
{
 product.options.map((option) => (
 <div>
 <label>{option.name}</label>
 <select onChange={(e) => handleChange(option.name, e.target.value)}>
 <option value="">Select an option</option>
 {option.values.split(',').map((value) => (
 <option key={value} value={value}>
 {value}
 </option>
 ))}
 </select>
 </div>
 ));
}
Next, we add the select onChange handler.
const [variations, setVariations] = useState({});

const handleChange = (option, value) => {
 setVariations((prevVariations) => ({
 ...prevVariations,
 [option]: value,
 }));
};
Once all options are selected by the user, the variations variable should look somthething like this:
{
 "Size": "S",
 "Color": "White"
}
Now that we have the options combinations we need to get the selected variation. Let's take a look to the variants field, it is an array:
variants: [
 {
 "id": 3522,
 "barcode": "434322432",
 "originalPrice": {
 "amount": 100.00,
 "baseAmount": null,
 "currencyCode": "NOK"
 },
 "price": "407.09",
 "quantity": 25,
 "sku": "S-Black",
 "title": "S-Black"
 },
 {
 "id": 3523,
 "barcode": "432432412",
 "originalPrice": {
 "amount": 100.00,
 "baseAmount": null,
 "currencyCode": "NOK"
 },
 "price": "100.00",
 "quantity": 40,
 "sku": "S-White",
 "title": "S-White"
 },
 ...
]
The key parameter to look for is the title, as it has the option combination for that particular variant. We will have to go through each variation and match the title with the variants selected by the final user in the frontend.
const selectedVariantTitle = product.options
 .map((option) => variations[option.name])
 .join('-'); //

const selectedVariant = product.variants.find(
 (variant) => variant.title === selectedVariantTitle
); // the value here will be an object with the selected variant
Using our example, the values of each variable will be:
selectedVariantTitle = 'S-White';
selectedVariant = {
 id: 3523,
 barcode: '432432412',
 originalPrice: {
 amount: 100.0,
 baseAmount: null,
 currencyCode: 'NOK',
 },
 price: '100.00',
 quantity: 40,
 sku: 'S-White',
 title: 'S-White',
};
This way we have now access to the variant id and when we add a product to the cart, we must include it:
const handleAddToCart = async (CART_ID, PRODUCT_ID, selectedVariant) => {
 const sdk = getSDK();
 const response = await sdk.shopCart.cartItem.create({
 cartId: CART_ID,
 line_items: [
 {
 product_id: PRODUCT_ID,
 quantity: 1,
 variant_id: selectedVariant.id, // add the variant id here
 price_data: {
 unit_price: Number(selectedVariant.originalPrice.amount), // use the variants info
 currency: selectedVariant.originalPrice.currencyCode, // use the variants info
 tax: 25,
 },
 },
 ],
 });
};
Update quantity or remove products
We will handle both directly with the quantity, adding an add and a remove button next to it.
We update the CartItem function:
const CartItem = ({ cart, setCart, item }) => {
 const isOneItem = item.quantity === 1;

 const handleRemoveFromCart = async () => {
 const sdk = getSDK();
 const response = await sdk.shopCart.cartItem.delete(cart.cart_id, item.id);
 setCart(response);
 };

 const handleUpdateCart = async (qty) => {
 const sdk = getSDK();
 const response = await sdk.shopCart.cartItem.update(cart.cart_id, item.id, {
 qty,
 });
 setCart(response);
 };

 return (
 <div className="flex flex-row items-center space-x-3 py-4">
 <img
 className="h-20 w-16 rounded object-cover"
 src={item.product_image?.[0]?.url}
 />
 <div className="flex flex-1 flex-col text-left">
 <div className="text-lg">{item.product_title}</div>
 <div className="pt-3 font-bold">
 <button
 className="h-8 w-8 rounded-full border border-black pb-0.5"
 onClick={() =>
 isOneItem
 ? handleRemoveFromCart()
 : handleUpdateCart(item.quantity - 1)
 }
 >
 {isOneItem ? 'x' : '-'}
 </button>
 <span className="px-2">{item.quantity}</span>
 <button
 className="h-8 w-8 rounded-full border border-black pb-0.5"
 onClick={() => handleUpdateCart(item.quantity + 1)}
 >
 +
 </button>
 </div>
 </div>
 <div className="font-bold">
 {item.price_data.unit_price} {item.price_data.currency}
 </div>
 </div>
 );
};
Interacting with the checkout
Create and get the checkout
For the creation or fetching of the checkout, we will mimicate the way we do it with the cart. When the customer clicks on the "Proceed to Checkout" button, we will create the checkout if not previously created or fetch it if we see it stored on the local storage.
Also, if the checkout is initiated, instead of the products, we will display the checkout, and keep on the sidebar the products list and order amounts.
On the App.jsx we will add:
...
 const [checkout, setCheckout] = useState(null);

 const handleCreateCheckout = async () => {
 const sdk = getSDK();
 const checkoutId = localStorage.getItem("reachu-checkout-id");
 if (checkoutId) {
 const response = await sdk.shopCart.checkout.getById(checkoutId);
 if (response) return setCheckout(response);
 } else {
 const response = await sdk.shopCart.checkout.create({
 cart_id: cart.cart_id,
 });
 localStorage.setItem("reachu-checkout-id", response.id);
 if (response) return setCheckout(response);
 }
 }
 ...
 <main>
 <div className="grid grid-cols-4">
 <div className="col-start-1 col-end-4 px-6 pb-20">
 {checkout ? (
 <DisplayCheckout
 checkout={checkout}
 />
 ) : (
 <DisplayProducts
 cart={cart}
 setCart={setCart}
 />
 )}
 </div>
 <div className="col-end-5 col-span-1 h-screen border-l border-black px-6">
 <DisplayCart
 cart={cart}
 setCart={setCart}
 checkout={checkout}
 handleCreateCheckout={handleCreateCheckout}
 />
 </div>
 </div>
 </main>
 ...
Update the checkout
This is an optional step, but we recomend that the first step of the checkout is to store the email of the potencial buyer. This way you can reach them if the checkout is abandoned before proceeding to payment.
We can create a small form to complete this and the next steps.
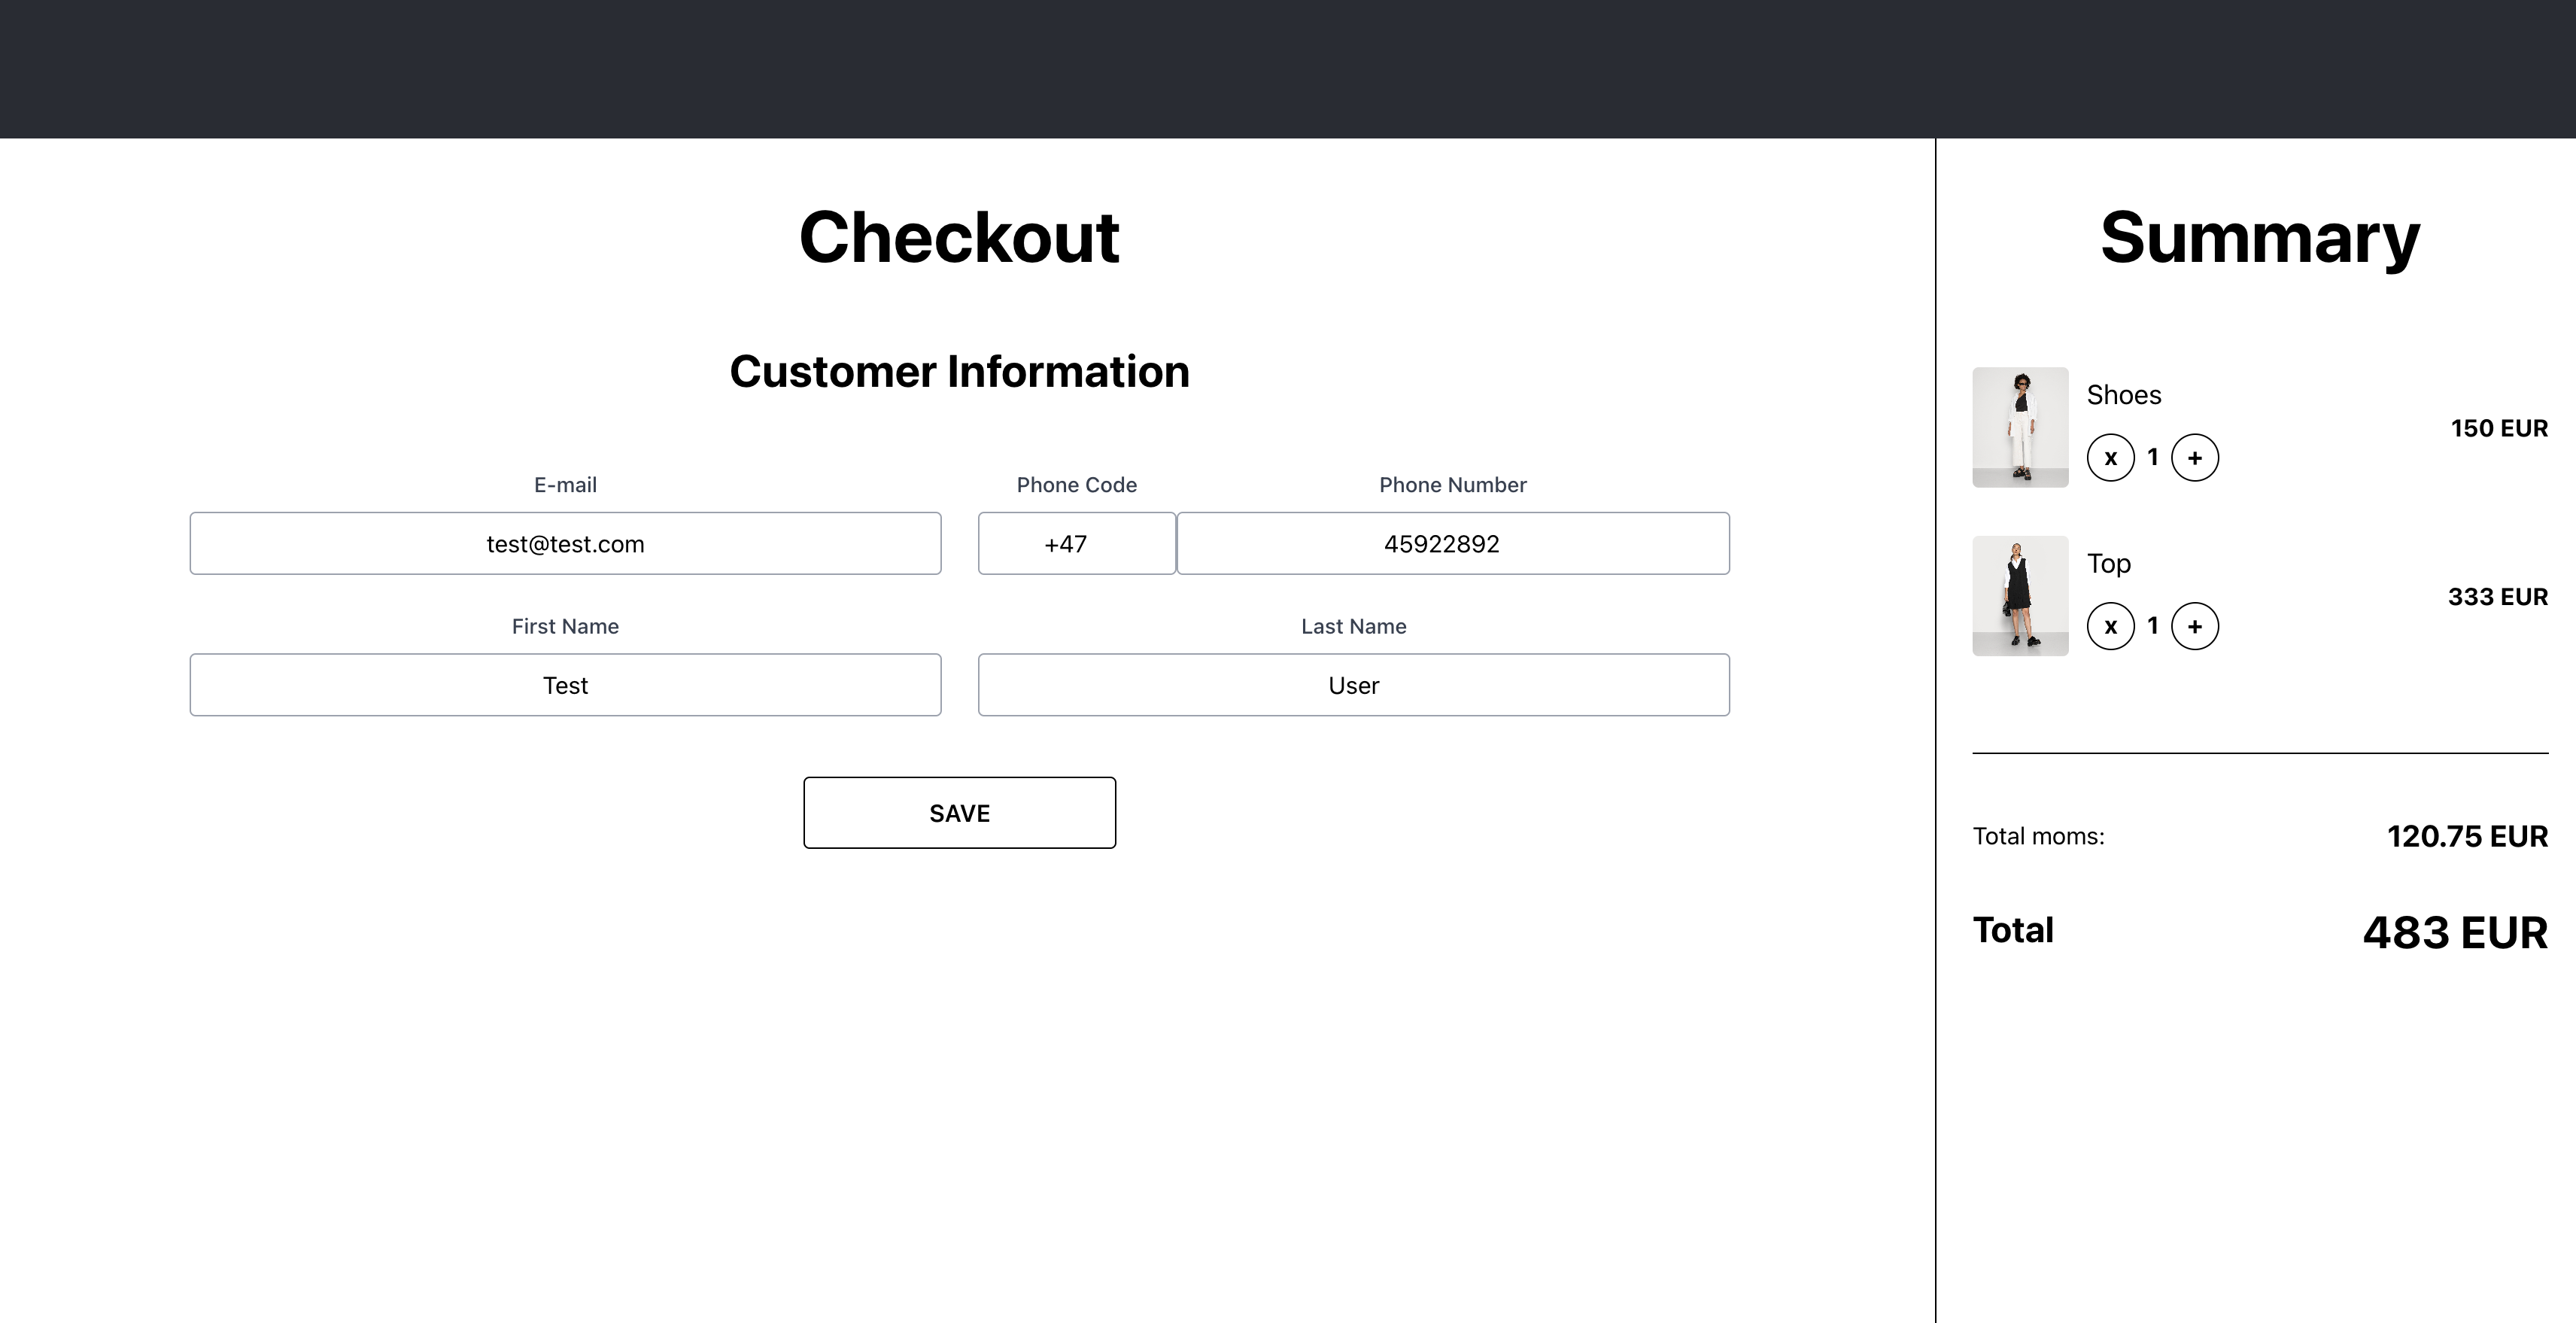
const DisplayCheckout = ({ checkout, setCheckout }) => {
 const handleUpdateCheckout = async (body) => {
 const sdk = getSDK();
 const response = await sdk.shopCart.checkout.update(checkout.id, body);
 if (response) setCheckout(response);
 };

 return (
 <>
 <h2 className="mb-12 mt-10 text-5xl font-bold">Checkout</h2>
 <div className="mx-auto max-w-screen-lg">
 <h3 className="mb-12 mt-10 text-3xl font-bold">Customer Information</h3>
 <FormInfo handleUpdateCheckout={handleUpdateCheckout} />
 </div>
 </>
 );
};
import { useState } from 'react';
import Button from '../../common/Button';
import FormField from '../../common/FormField';

const FormInfo = ({ checkout, handleUpdateCheckout }) => {
 const [valid, setValid] = useState(false);

 return (
 <form
 onChange={(e) => {
 setValid(e.currentTarget.checkValidity());
 }}
 className="flex h-full flex-col"
 onSubmit={(e) => {
 e.preventDefault();
 const data = new FormData(e.currentTarget);
 const formFields = [
 'email',
 'phone_code',
 'phone',
 'first_name',
 'last_name',
 ];
 const values = formFields.reduce(
 (acc, field) => ({ ...acc, [field]: data.get(field) }),
 {}
 );
 const body = {
 email: values.email,
 billing_address: {
 first_name: values.first_name,
 last_name: values.last_name,
 phone_code: values.phone_code,
 phone: values.phone,
 },
 shipping_address: {
 first_name: values.first_name,
 last_name: values.last_name,
 phone_code: values.phone_code,
 phone: values.phone,
 },
 };
 handleUpdateCheckout(body);
 }}
 >
 <div className="flex-1 overflow-y-auto">
 <div className="grid grid-cols-2 gap-6 pb-6">
 <FormField
 label="E-mail"
 name="email"
 defaultValue={checkout?.email || ''}
 type="email"
 autoComplete="email"
 autoFocus
 required
 />
 <div className="flex">
 <FormField
 label="Phone Code"
 name="phone_code"
 defaultValue={checkout?.billing_address?.phone_code || ''}
 type="number"
 autoComplete="phone_code"
 autoFocus
 required
 />
 <FormField
 label="Phone Number"
 name="phone"
 defaultValue={checkout?.billing_address?.phone || ''}
 type="number"
 className="w-full"
 autoComplete="phone"
 autoFocus
 required
 />
 </div>
 <FormField
 label="First Name"
 name="first_name"
 defaultValue={checkout?.billing_address?.first_name || ''}
 required
 autoComplete="given-name"
 />
 <FormField
 label="Last Name"
 name="last_name"
 defaultValue={checkout?.billing_address?.last_name || ''}
 required
 autoComplete="family-name"
 />
 </div>
 </div>
 <div className="block flex-row pt-4">
 <Button type="submit" disabled={!valid} className="mx-auto w-52">
 <div className="flex-1 text-center">Save</div>
 </Button>
 </div>
 </form>
 );
};

export default FormInfo;
Shipping
Each product may have different shipment options as they may come from different suppliers. Before initiating the payment, a shipment for each product must be confirmed.
We should start by updating the shipping country of the cart. This is mandatory as this will automatically update the available shipping classes on each product in the line items array.
Here we have a good trick for you. Based on the products added to the cart, we check the shipping countries of each product and we return an array with just the shipping codes available in your products. This way we narrow the options we display on our country selector. You will find this data on the cart object under this parameter:
"available_shipping_countries": ["NO", "SE", "US"]
You can choose the best way to update it and where to display it on your front-end, and here is the function to do it:
const updateShippingCountry = async (checkout) => {
 const updatedCart = await getSDK().shopCart.cart.update(
 checkout.cart.cart_id,
 {
 shipping_country: 'NO',
 }
 );
 return updatedCart;
};
After this, for each product you can set one shipping class as default or update it to a new one by using the shopCart.cartItem.update sdk feature.
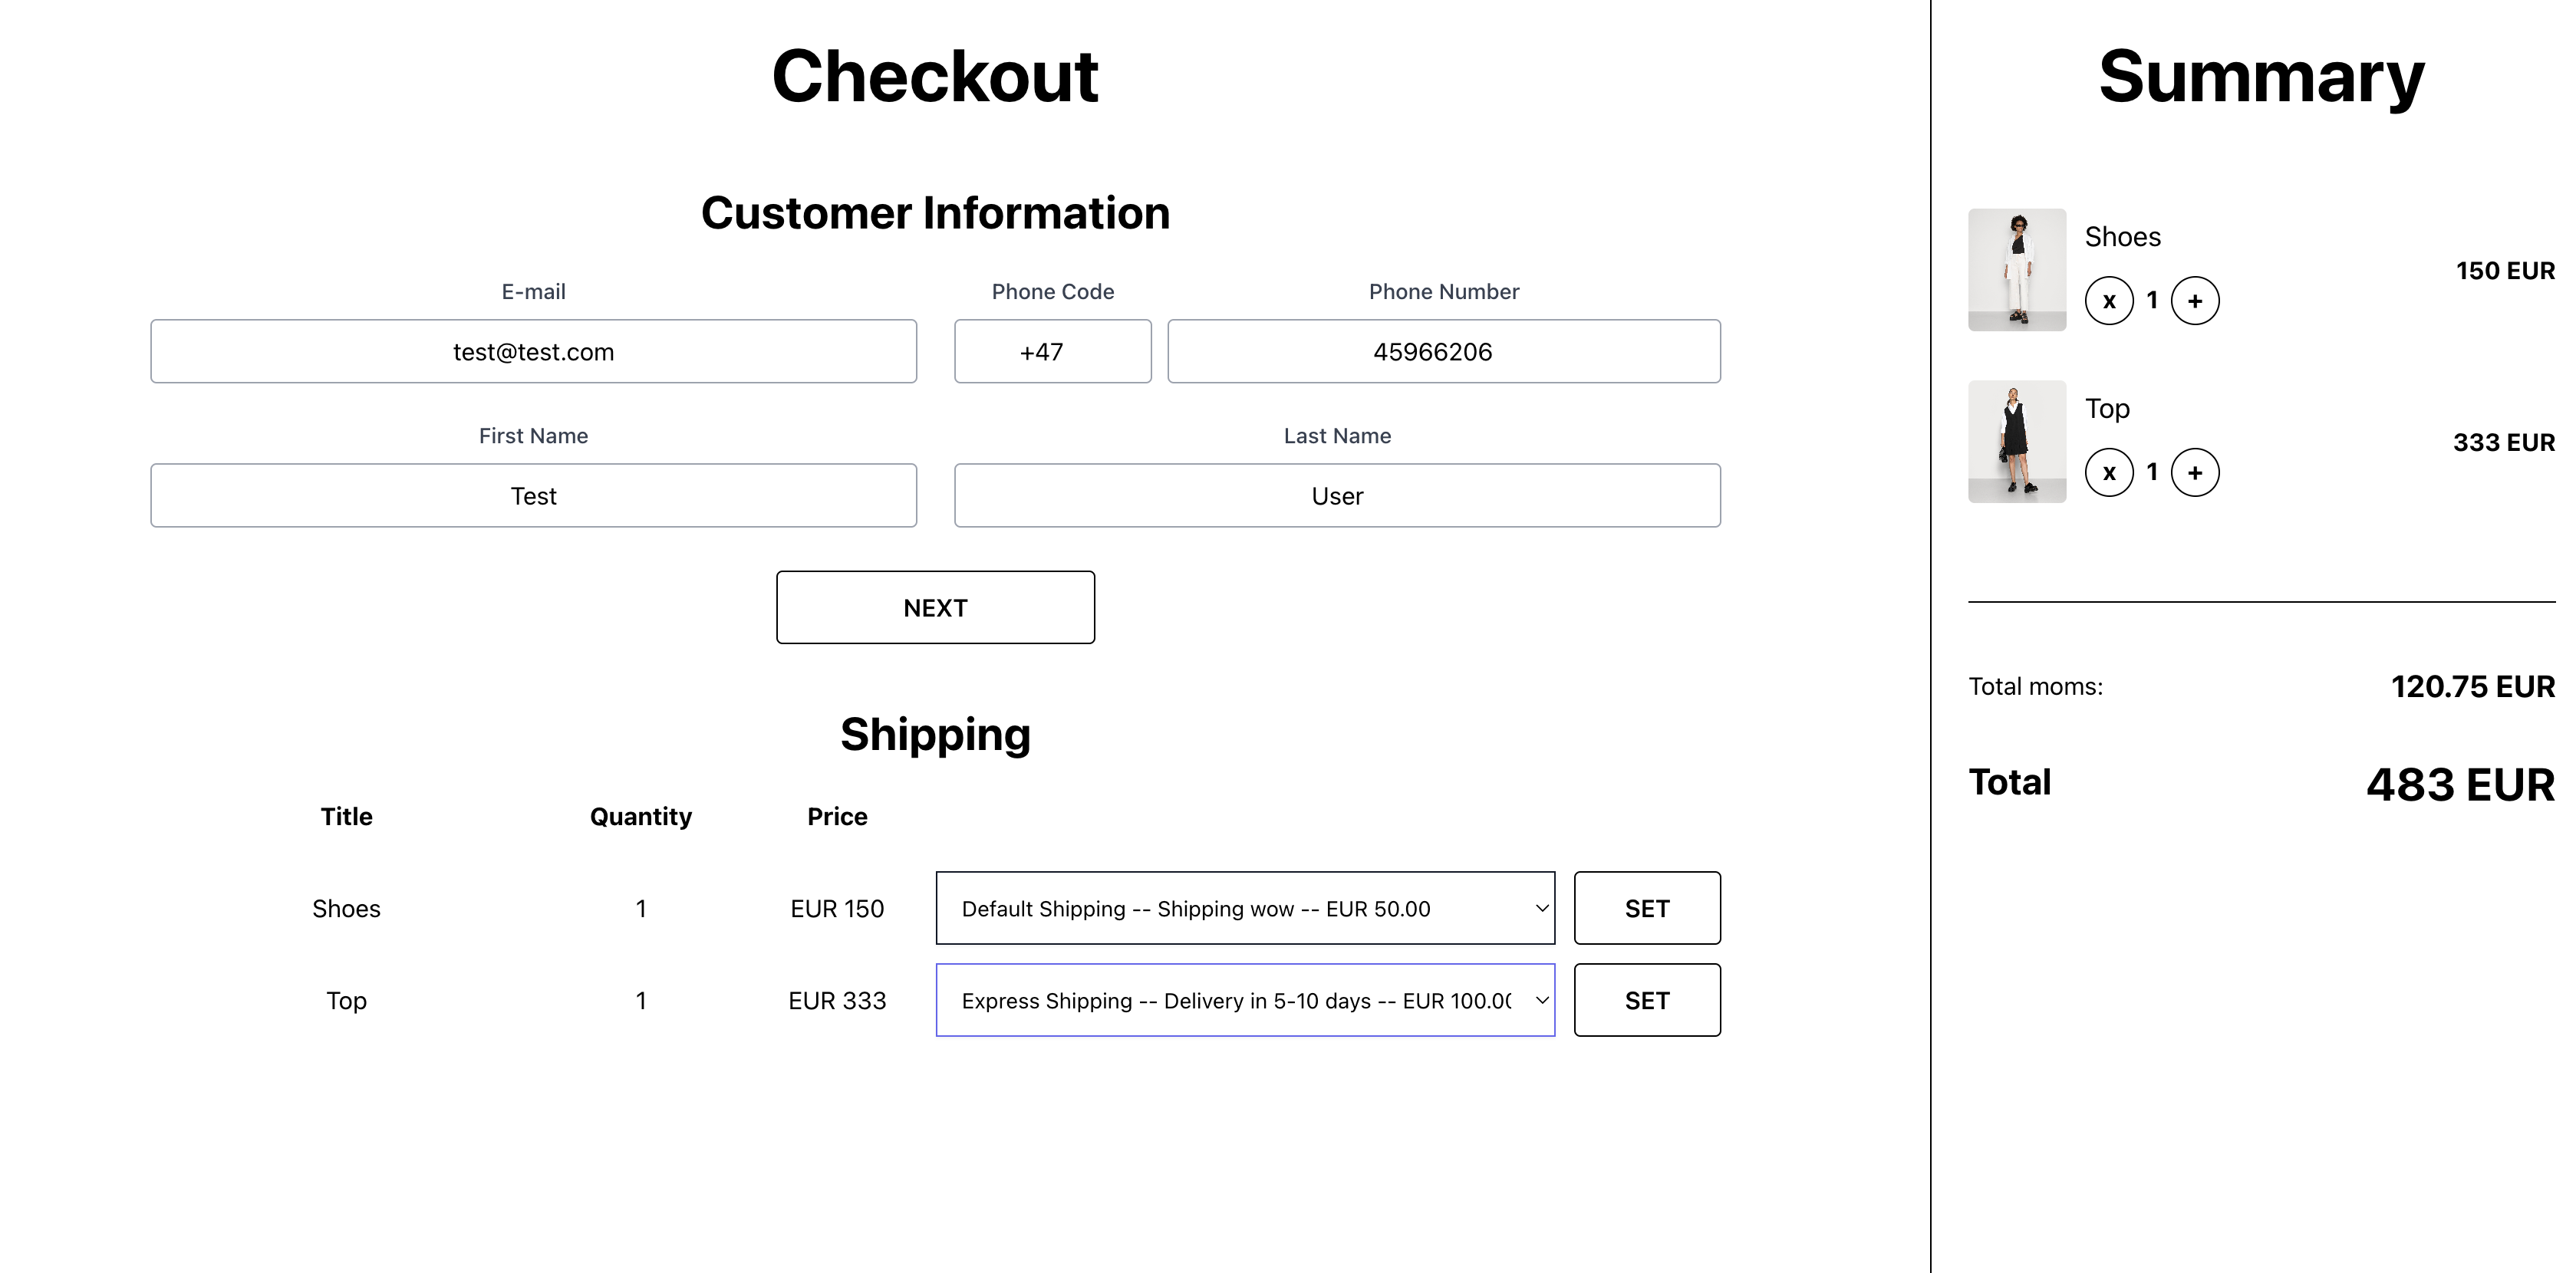
src/checkout/components/FormShipping.jsx
import { getSDK } from '../../../reachu-sdk';

const ShippingItem = ({ item, cartId, checkoutId, setCheckout }) => {
 const onChange = async (e) => {
 const shippingId = e.target.value;
 const sdk = getSDK();
 const response = await sdk.shopCart.cartItem.update(cartId, item.id, {
 shipping_id: shippingId,
 });
 if (response) {
 const checkout = await sdk.shopCart.checkout.getById(checkoutId);
 setCheckout(checkout);
 }
 };

 return (
 <div className="mb-3">
 <div className="grid grid-cols-2 items-center">
 <div className="grid grid-cols-4">
 <span className="col-span-2">{item.product_title}</span>
 <span>{item.quantity}</span>
 <span>
 {item.price_data?.currency} {item.price_data?.unit_price}
 </span>
 </div>
 <div className="flex">
 <select
 name="shipping"
 placeholder="Shipping"
 className="mr-3 block w-full border border-gray-900 bg-white px-3 py-2 shadow-sm focus:border-indigo-500 focus:outline-none focus:ring-indigo-500 sm:text-sm"
 onChange={onChange}
 >
 {item.product_available_shippings.map(
 ({ id, name, description, price }) => (
 <option key={id} value={id}>
 {name} -- {description} -- {price.currencyCode} {price.amount}
 </option>
 )
 )}
 </select>
 </div>
 </div>
 </div>
 );
};

const FormShipping = ({ checkout, setCheckout }) => {
 return (
 <div className="flex-1 overflow-y-auto">
 <div>
 <div className="grid grid-cols-2">
 <div className="grid grid-cols-4 pb-6 font-bold">
 <span className="col-span-2">Title</span>
 <span>Quantity</span>
 <span>Price</span>
 </div>
 </div>
 <div></div>
 {checkout?.cart?.line_items?.map((item) => (
 <ShippingItem
 key={item.id}
 item={item}
 cartId={checkout.cart.cart_id}
 checkoutId={checkout.id}
 setCheckout={setCheckout}
 />
 ))}
 </div>
 </div>
 );
};

export default FormShipping;
Payment
In the checkout object you will have the information of the available payment methods for your user:
"availablePaymentMethods": [
 {
 "name": "Stripe"
 },
 {
 "name": "Klarna"
 }
]
We can let the user select the payment method on the frontend:
src/checkout/DisplayCheckout.jsx
...
const [selectedPayment, setSelectedPayment] = useState(null);
const availablePaymentMethods = checkout?.availablePaymentMethods;
...
 <h3 className="font-bold text-3xl mt-10 mb-12">
 Payment
 </h3>
 <div className="flex justify-center gap-6 max-w-md mx-auto">
 {availablePaymentMethods.map(payment => (
 <Button
 onClick={() => setSelectedPayment(payment.name)}
 filled={selectedPayment === payment.name}
 >
 {payment.name}
 </Button>
 ))}
 </div>
...
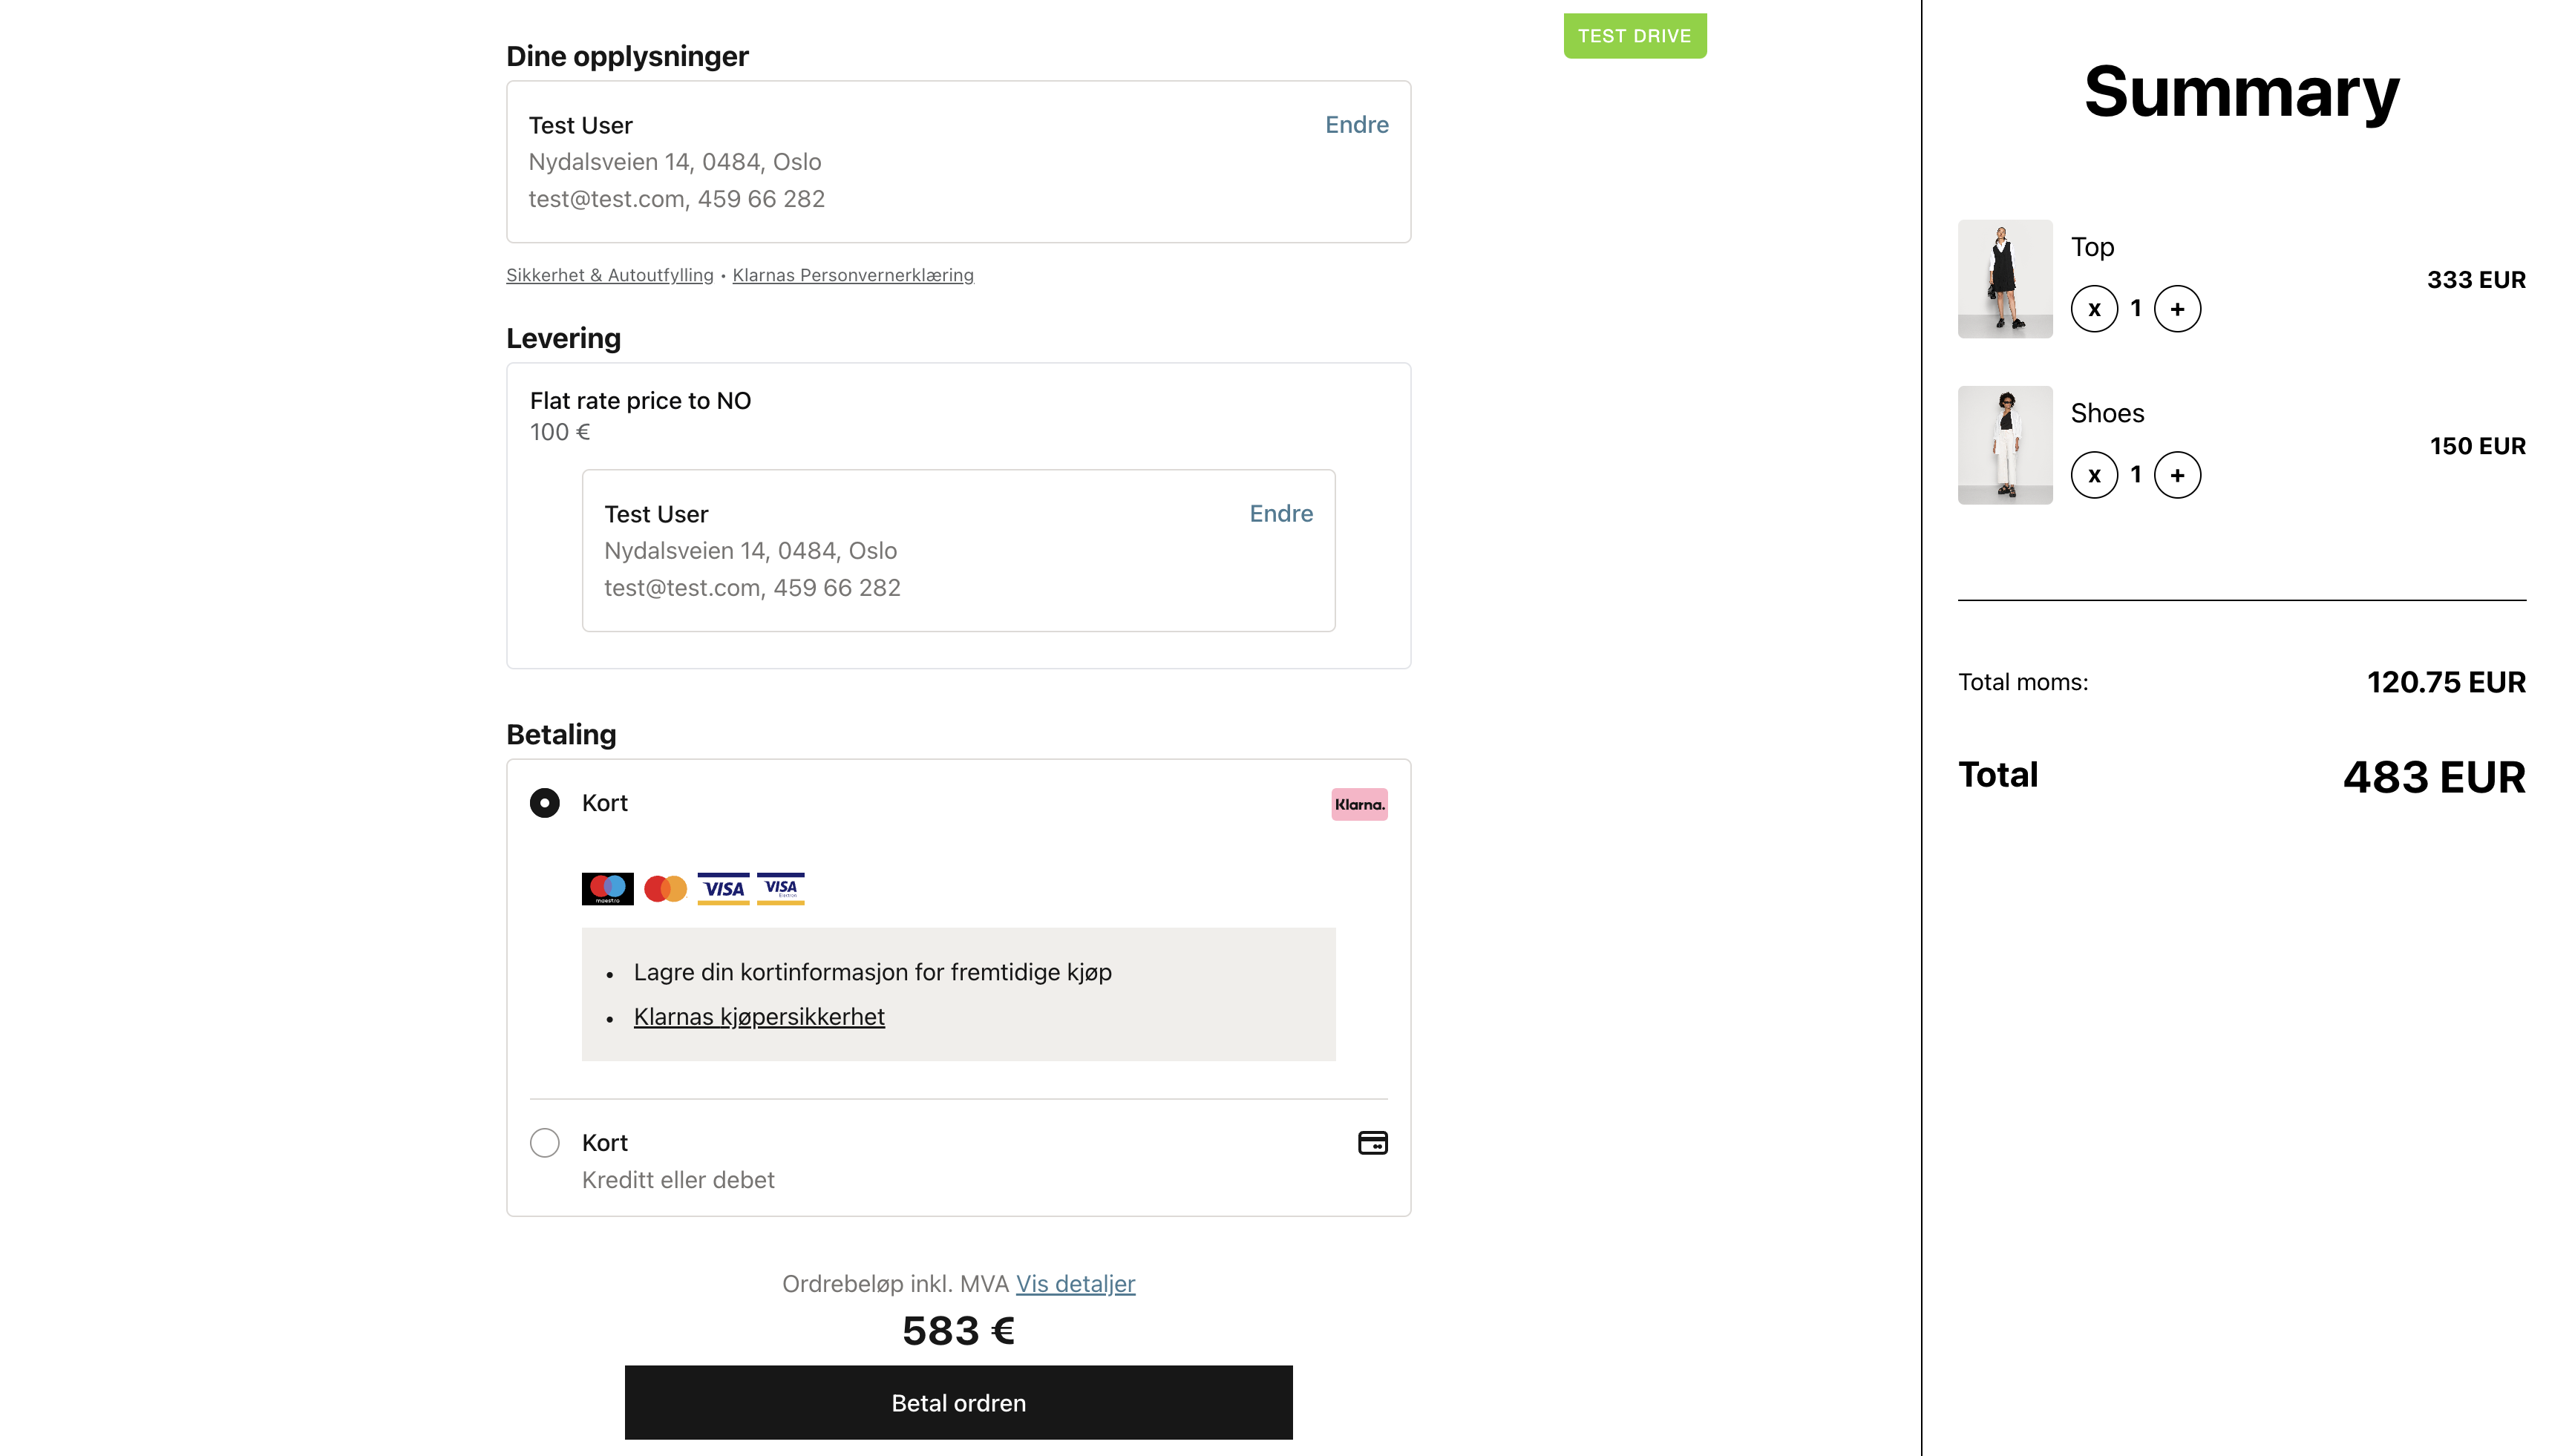
Klarna
For Klarna we already have all information and we can initiate payment. The Klarna snippet handles the shipping and billing address information of the customer.
Still, to initiate Klarna, you need to provide:
- the cart id
- the email of the user
- the country code (ISO 3166 Alpha-2)
- the current location of the user

src/checkout/DisplayCheckout.jsx
...
const [initiateKlarna, setInitiateKlarna] = useState(false);
...
 {selectedPayment === "Klarna" && (
 <>
 <div className="flex my-12 justify-center mx-auto">
 <Button
 filled
 className="max-w-xs"
 onClick={() => setInitiateKlarna(true)}
 >
 Go to payment
 </Button>
 </div>
 {initiateKlarna && (
 <DisplayKlarna cart={checkout?.cart} />
 )}
 </>
 )}
...
src/checkout/components/DisplayKlarna.jsx
import { useEffect } from 'react';
import { getSDK } from '../../../reachu-sdk';

const DisplayKlarna = ({ cart }) => {
 useEffect(() => {
 const fetchCheckout = async () => {
 const data = await getSDK().klarna.payment.init(
 {
 email: 'coworking@iqplus.no',
 country_code: 'NO',
 href: `${window.location.origin}${window.location.pathname}`,
 },
 cart.id || cart.cart_id
 );
 const checkoutContainer = document.getElementById(
 'klarna-checkout-container'
 );
 checkoutContainer.innerHTML = data.html_snippet;
 const scriptsTags = checkoutContainer.getElementsByTagName('script');
 for (let i = 0; i < scriptsTags.length; i++) {
 const parentNode = scriptsTags[i].parentNode;
 const newScriptTag = document.createElement('script');
 newScriptTag.type = 'text/javascript';
 newScriptTag.text = scriptsTags[i].text;
 parentNode.removeChild(scriptsTags[i]);
 parentNode.appendChild(newScriptTag);
 }
 };
 fetchCheckout();
 }, []);

 return <div id="klarna-checkout-container" style={{ width: '100%' }} />;
};

export default DisplayKlarna;
Success page
Once the customer completes the payment, you will be redirected to the href url you provided before, including in the params the order_id. You can now display a new Klarna snippet with the order confirmation information.
const search = window.location.search || '';
const urlParams = new URLSearchParams(search);
const isSuccess = urlParams.get('success') === 'true';
const orderId = urlParams.get('order_id');
import { useEffect } from 'react';
import { getSDK } from '../reachu-sdk';

const KlarnaSuccess = ({ orderId }) => {
 useEffect(() => {
 const fetchOrder = async () => {
 const data = await getSDK().klarna.order.getById(orderId);
 const confirmationContainer = document.getElementById(
 'klarna-checkout-confirmation'
 );
 confirmationContainer.innerHTML = data.html_snippet;
 const scriptsTags = confirmationContainer.getElementsByTagName('script');
 for (let i = 0; i < scriptsTags.length; i++) {
 const parentNode = scriptsTags[i].parentNode;
 const newScriptTag = document.createElement('script');
 newScriptTag.type = 'text/javascript';
 newScriptTag.text = scriptsTags[i].text;
 parentNode.removeChild(scriptsTags[i]);
 parentNode.appendChild(newScriptTag);
 }
 };
 if (orderId) {
 fetchOrder();
 }
 }, []);
 return (
 <div>
 <div id="klarna-checkout-confirmation" style={{ width: '100%' }}></div>
 <div className="flex justify-center">
 <a href="/" className="mt-16 rounded bg-black px-12 py-4 text-white">
 Continue shoping
 </a>
 </div>
 </div>
 );
};

export default KlarnaSuccess;
Stripe
For Stripe we will need to get the shipping and the billing address before payment initiation.
So, if Stripe is selected, we will add an additional form to collect this data.
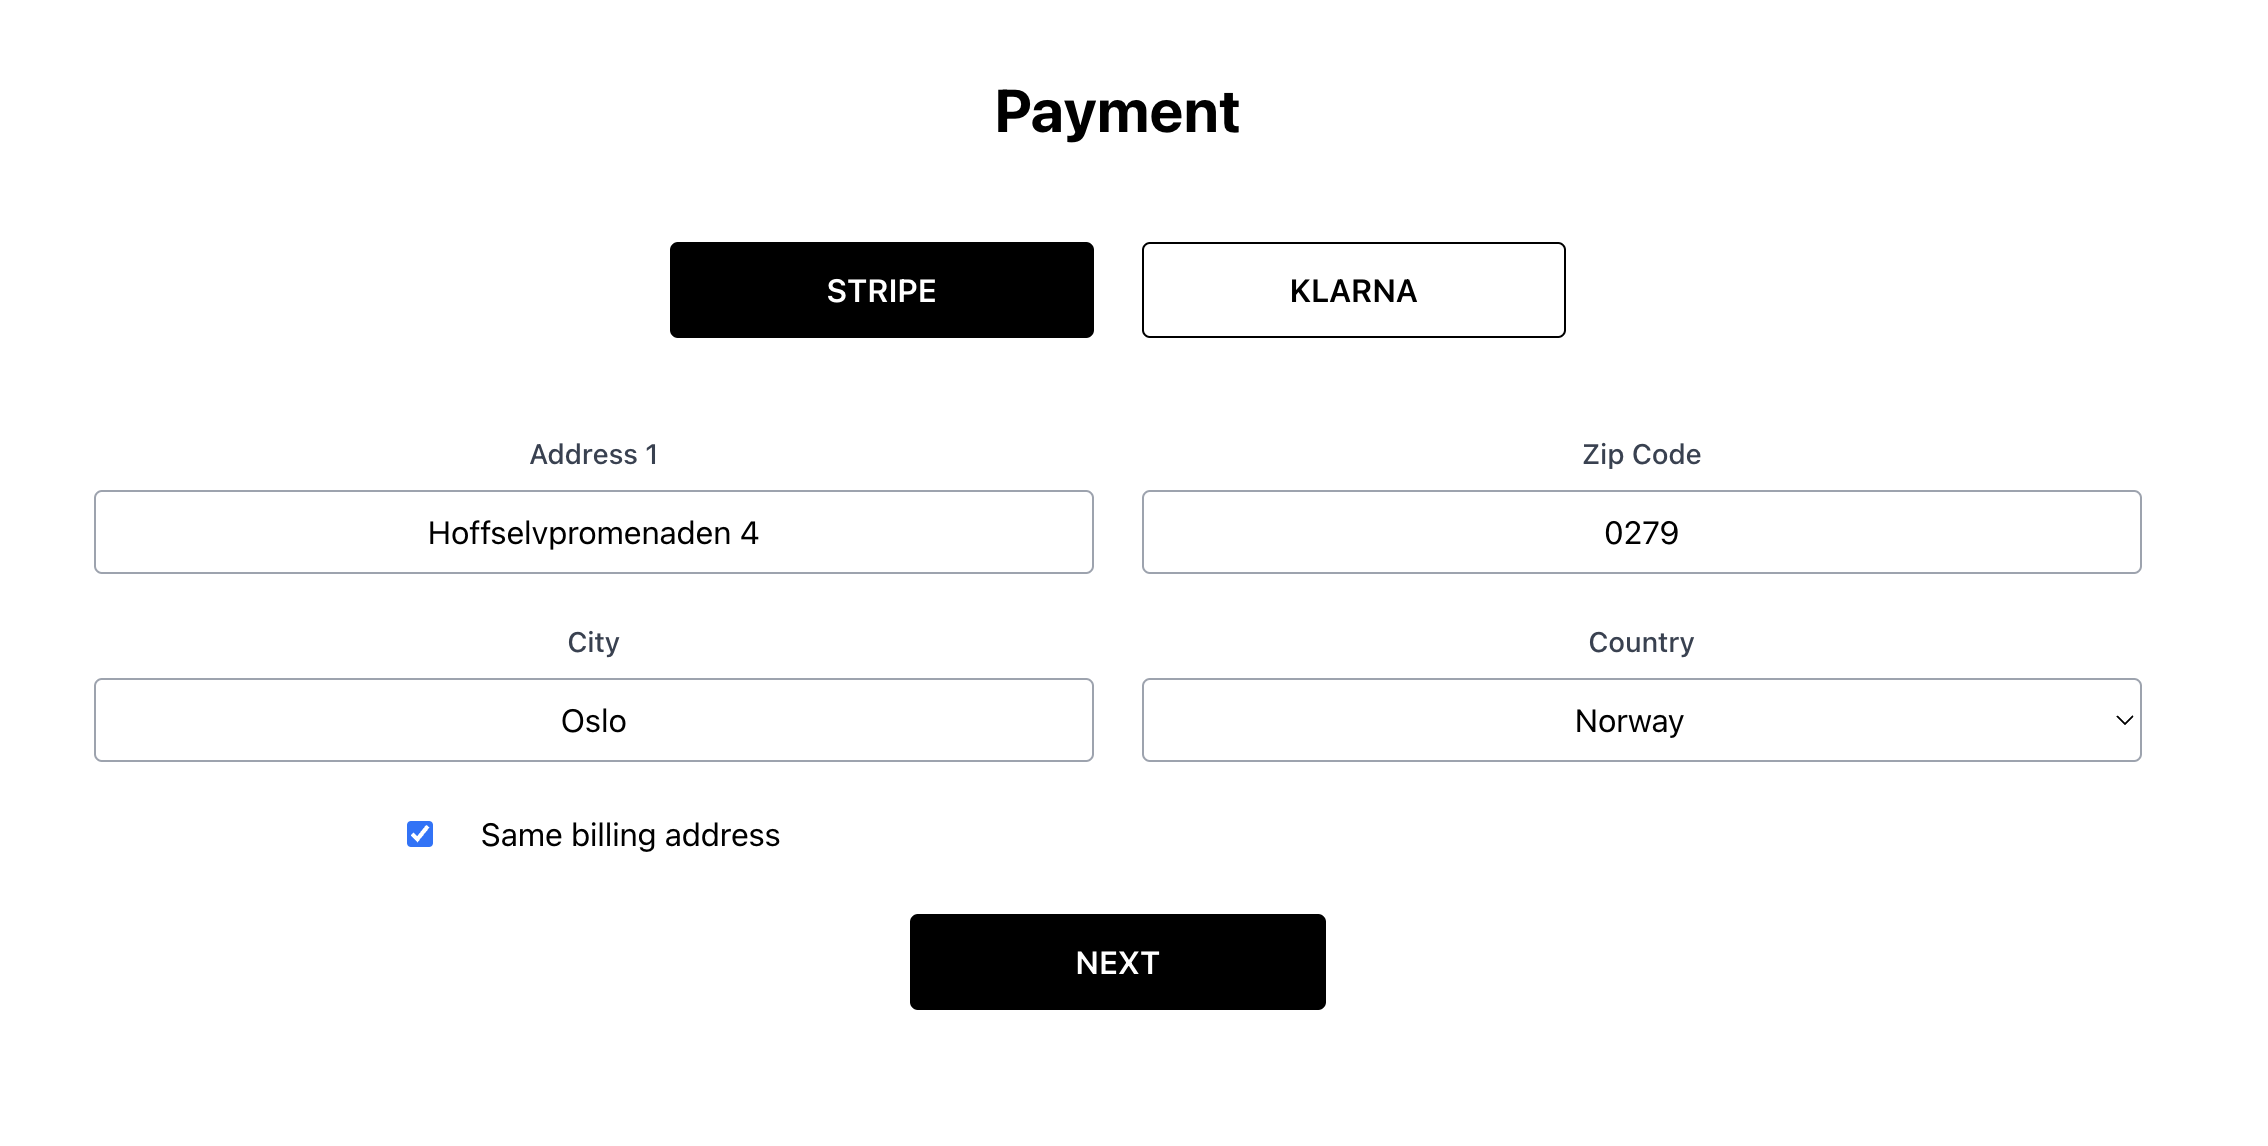
import { useState } from 'react';
import Button from '../../common/Button';
import FormField from '../../common/FormField';
import CountrySelect from '../../common/CountrySelect';

const FormStripe = ({ handleUpdateCheckout }) => {
 const [valid, setValid] = useState(false);

 return (
 <form
 onChange={(e) => {
 setValid(e.currentTarget.checkValidity());
 }}
 className=""
 onSubmit={(e) => {
 e.preventDefault();
 const data = new FormData(e.currentTarget);
 const formFields = [
 'address1',
 'address2',
 'zip',
 'city',
 'country_code',
 'same_billing',
 ];
 const values = formFields.reduce(
 (acc, field) => ({ ...acc, [field]: data.get(field) }),
 {}
 );
 const body = {
 billing_address: { ...values },
 shipping_address: { ...values },
 };
 handleUpdateCheckout(body, 'stripe');
 }}
 >
 <div className="">
 <div className="grid grid-cols-2 gap-6 pb-3">
 <FormField
 label="Address 1"
 name="address1"
 defaultValue=""
 autoFocus
 required
 />
 <FormField
 label="Zip Code"
 name="zip"
 defaultValue=""
 required
 autoFocus
 />
 <FormField
 label="City"
 name="city"
 defaultValue=""
 required
 autoFocus
 />
 <CountrySelect
 label="Country"
 name="country_code"
 defaultValue="NO"
 className=""
 autoFocus
 />
 <div className="flex items-center justify-center">
 <input
 type="checkbox"
 name="same_billing"
 className="mr-6"
 checked
 />
 <label htmlFor="same_billing">Same billing address</label>
 </div>
 </div>
 </div>
 <div className="block pt-4">
 <Button type="submit" disabled={!valid} className="mx-auto w-52" filled>
 Next
 </Button>
 </div>
 </form>
 );
};

export default FormStripe;
When the user clicks on the Next button, we recommend to update the checkout with the shipping and billing values:
const handleUpdateCheckout = async (body, step) => {
 const sdk = getSDK();
 const response = await sdk.shopCart.checkout.update(checkout.id, body);
 if (response) setCheckout(response);
 if (step === 'stripe') setInitiateStripe(true);
};
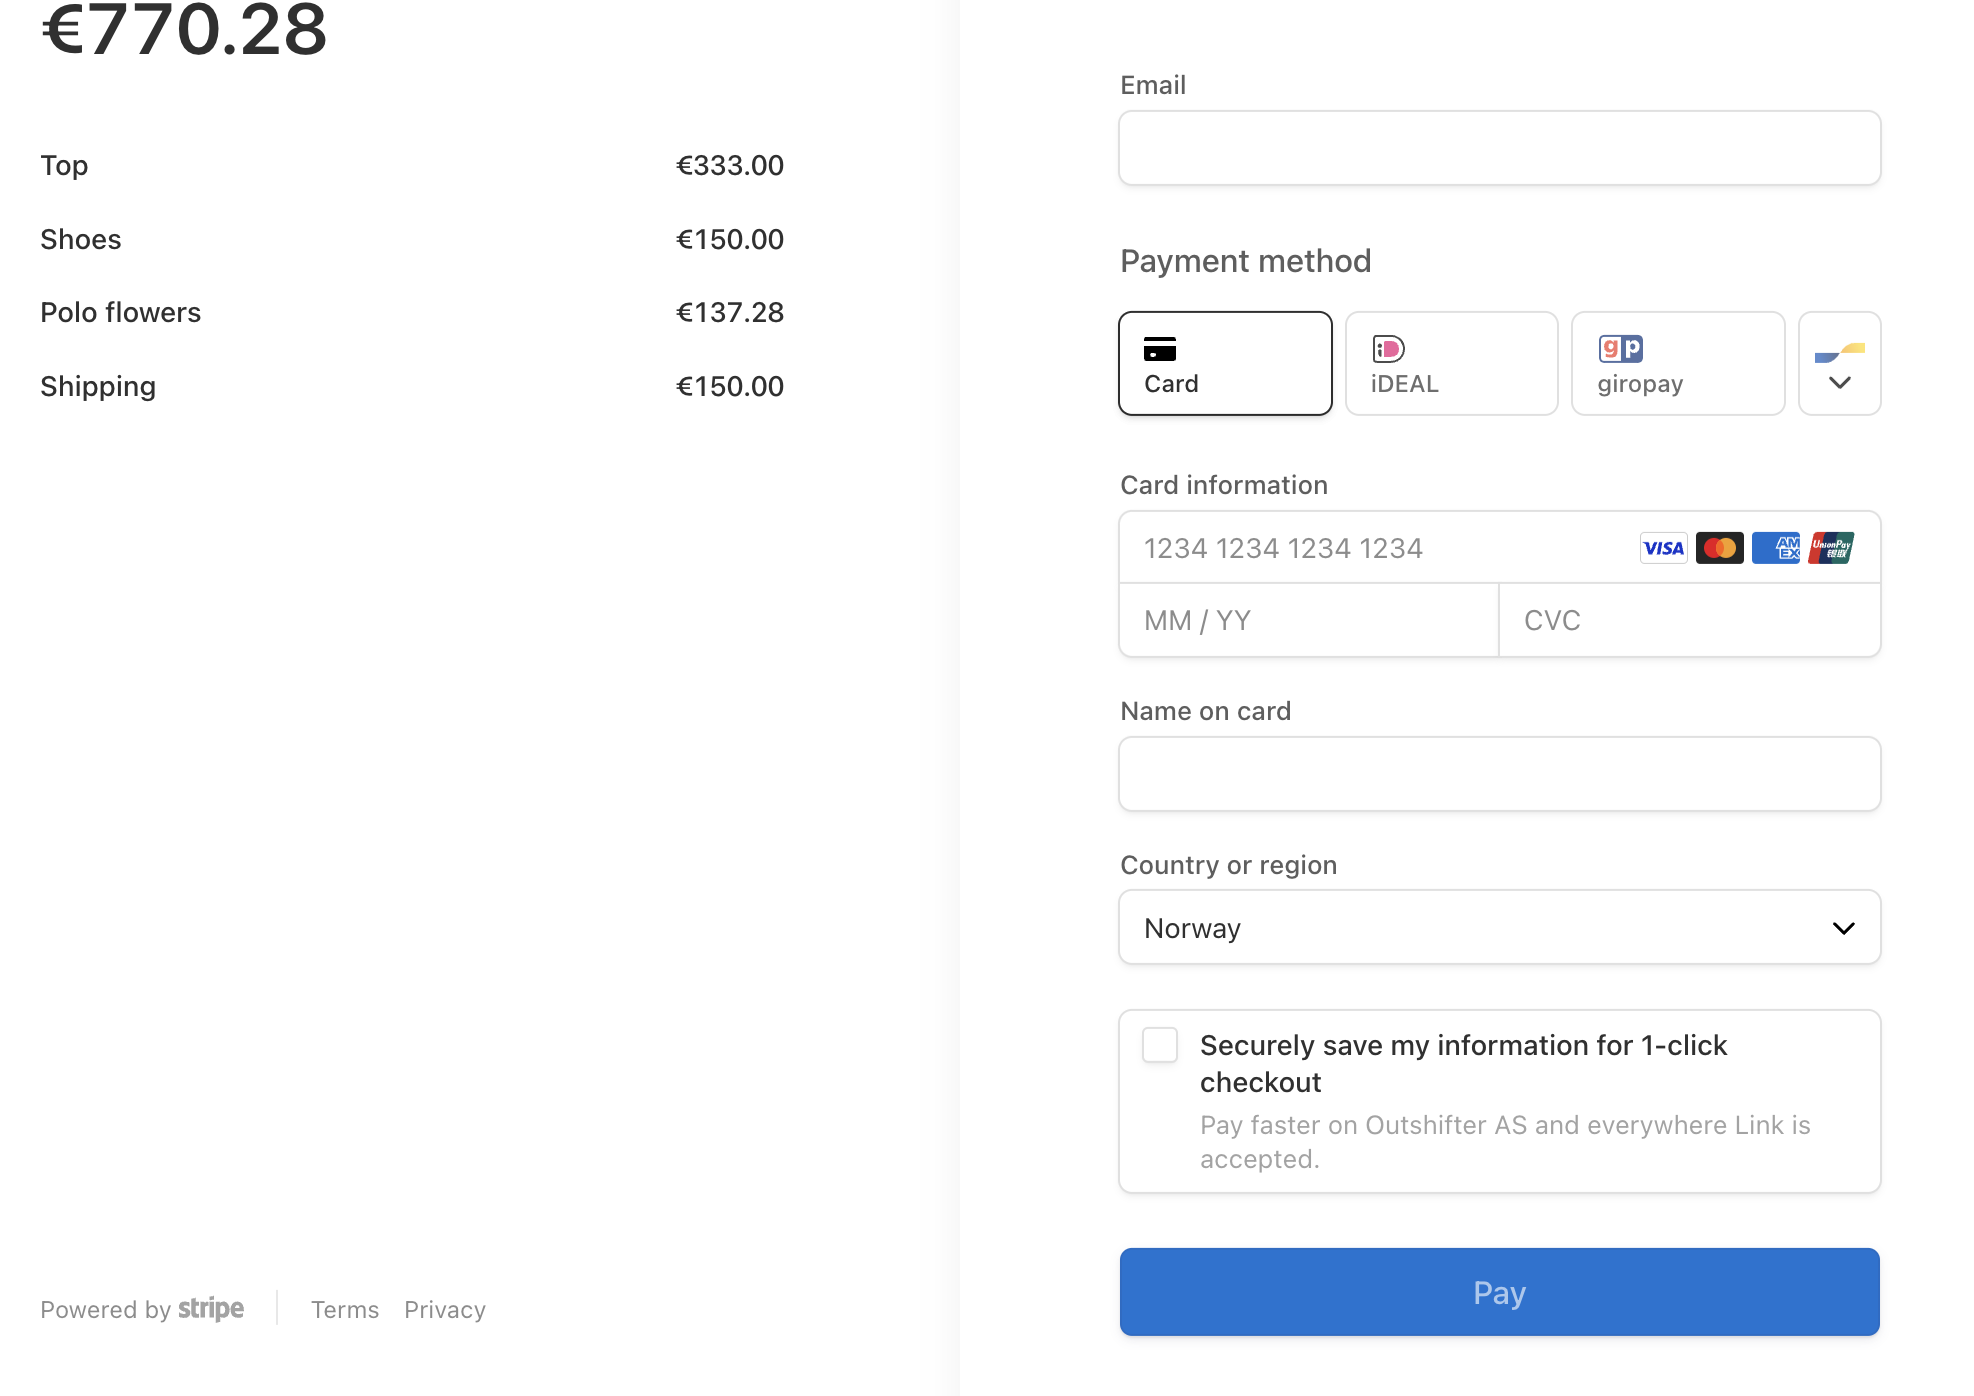
Here you can decide to trigger the initiate payment right away or request an additional click to Go to Payment. As stated in the documentation, the response will provide a checkout_url we need to redirect the user to. The funciton should look like this:
const handleInitiateStripe = async () => {
 const sdk = getSDK();
 const response = await sdk.shopCart.payment.create(checkout.id, {
 success_url: `${window.location.origin}${window.location.pathname}?success=true`,
 cancel_url: `${window.location.origin}${window.location.pathname}?canceled=true`,
 payment_method: 'Stripe',
 email: checkout.email,
 });
 if (response) window.location.href = response.checkout_url;
};
The user should be redirected to this page:
Success page
Once the user completes the final step of the checkout, it will be redirected back to the success url you previously provided.
Using params on the succes url you can activate the order confirmation page.
Using the stored information on the localstorage you can retrieve the order information and print it on this page:
import { useState, useEffect } from 'react';
import { getSDK } from '../reachu-sdk';

const StripeSuccess = () => {
 const [payment, setPayment] = useState(null);

 useEffect(() => {
 const fetchCheckout = async () => {
 const checkoutId = localStorage.getItem('reachu-checkout-id');
 if (checkoutId) {
 const sdk = getSDK();
 const response = await sdk.shopCart.payment.getByCheckoutId(checkoutId);
 if (response) return setPayment(response);
 }
 };
 fetchCheckout();
 }, []);

 return (
 <>
 <div className="flex justify-center py-24 text-center">
 <div>
 <svg
 xmlns="http://www.w3.org/2000/svg"
 width="90"
 height="90"
 viewBox="0 0 24 24"
 className="mb-6 w-full"
 >
 <path d="M12 2c5.514 0 10 4.486 10 10s-4.486 10-10 10-10-4.486-10-10 4.486-10 10-10zm0-2c-6.627 0-12 5.373-12 12s5.373 12 12 12 12-5.373 12-12-5.373-12-12-12zm6.25 8.891l-1.421-1.409-6.105 6.218-3.078-2.937-1.396 1.436 4.5 4.319 7.5-7.627z" />
 </svg>
 <h1 className="text-3xl font-bold">Your order is completed.</h1>
 </div>
 </div>
 <div className="text-center">
 <a href="/" className="rounded bg-black px-12 py-4 text-white">
 Continue shoping
 </a>
 </div>
 </>
 );
};

export default StripeSuccess;